


Reference
BTS Laptop Utility Program Windows
Chapter 5
107
Reference
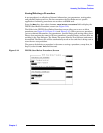
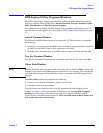
Test Set Screen Capture Window
The Test Set Screen Capture window allows you to capture a Test Software screen image
and save it as a bit map file for later view or use. This is very helpful when using the Test
Set spectrum analyzer or when you wish to capture some other screen. Note that IBASIC
program operation must be paused first, by pressing the Pause/Continue key, to print any
of the TESTS screens used for automated testing.
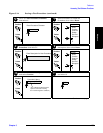
To capture a Test Software screen, configure the PC and the Test Set, then attempt a
screen capture, as follows:
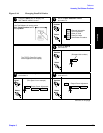
1. If the Test Set SERIAL 9 port and the PC serial port are not configured, configure
both ports (see “Configuring the Test Set and PC Serial Ports for Communication
with the Test Set” on page 29).
2. Select the screen that you wish to save and make any required entries on that screen
to display the desired information.
3. If the screen that you intend to capture is one that appears only when the Test
Software is running (a star appears in the upper right-hand corner of the display),
press the
Pause/Continue key to pause it.
4. Press the Test Set
Shift key. then the Inst Config (I/O Config) key. The Test Set will
display the I/O CONFIGURE screen.
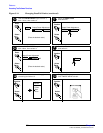
5. Select the Serial_9 In field and press the knob to toggle the setting to Inst
(underlined).
6. Press the Test Set
Shift key, then the Print (Printer Config) key. The Test Set will
display the PRINTER CONFIGURE screen.
7. Select the Model field and select DeskJet from the drop-down Choices: list.
8. Select the Printer Port field and select Serial 9 from the drop-down Choices: list.
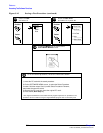
9. If the screen of interest is one that appears only when the Test Software is running,
press the
Menu key. The Test Software will display the SOFTWARE MENU screen.
10.If the screen of interest is one that appears only when the Test Software is running,
select the IBASIC IBASIC Cntrl field. The Test Software will display again the
screen that you set up in Step 2.
11.Press the Test Set
Print key. The currently-displayed screen should appear in the Test
Set Screen Capture window on the PC screen.
12.If the screen is satisfactory and you wish to use or view it later, enter a name for the
file in the Test Set Screen Capture window Title field.
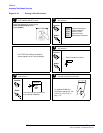
13.On the Test Set Screen Capture window tool bar, click on the third button from the
left (Save Image).
14.On the drop-down Save window, select the location to which you wish to save the
image. Make certain that the Save as type: field is set to .bmp, and click on Save.
The file will be saved as a bit-mapped image in the location that you selected.