


Installation
Connecting the PC to the Test Set and the MSC
Chapter 2
33
Installation
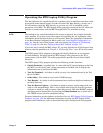
Step 6. Select the Printer Port field and select Serial 9 from the drop-down Choices: list.
Step 7. With the cable connections complete and BTS Laptop Utility program running on the
PC, press the Test Set
Print key. The currently-displayed screen should appear in the
Test Set Screen Capture window on the PC screen.
Connecting the PC to the MSC
After installing BTS Laptop Utility program on the PC, you must establish the
connection between the PC and the MSC. This may be accomplished using either a direct
dial-up modem connection or a telnet connection. These methods are described in the
following sections.
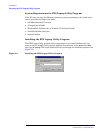
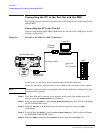
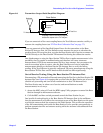
Connect the PC to the MSC via a phone line or LAN connection as shown in Figure 2-6
Testing a Direct-Dial Modem Connection
The PC modem must be connected to a phone line capable of connecting to the MSC. If no
phone line is available at the Base Station, a wireless phone with a properly configured
wireless-capable modem will suffice.
Test a modem connection as follows:
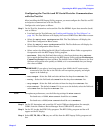
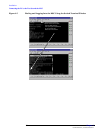
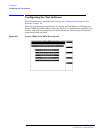
Step 1. From the BTS Laptop Utility program tool bar, select SW.
Step 2. In the Switch Terminal window, select Dial.
Step 3. In the drop-down Dial window, enter the MSC phone number, then select OK (see
Figure 2-7).
Step 4. When prompted in the Switch Terminal window by the MSC, enter the same
commands that you would use in your usual communication program to log in to the
ECP. Once logged into the ECP, enter the maintenance craft shell. When you have
finished, a command prompt will appear, which indicates that the MSC is waiting for the
next command.
If you intend to start testing the Base Station soon, leave the MSC connection enabled. If
some time will elapse before you start testing, log off from the MSC, and click on the
Hangup/Disconnect (HU) button in the Switch Terminal window.