


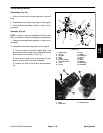

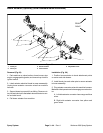
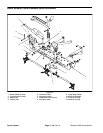

Disassembly (Fig. 53)
1. Remove four (4) washer head screws that secure
cover tube. Remove one (1) screw (item 1) that retains
rear housing. Slide rear housing and housing gasket
from assembly.
2. Slide thin washer, intermediate gear, and thick wash-
er from front housing support pin.
3. In order, remove washer, clutch, woodruff key, and
second washer from ball screw shaft.
4. Pull cover tube from front housing. Remove cover
tube gasket.
5. Loosen and remove two (2) hex nuts that secure mo-
tor to front housing. Slide motor, motor gear, and motor
seal from front housing.
6. Remove ball screw and brake assembly from front
housing.
7. Clean actuator components. Replace worn or dam-
aged parts.
8. Discard and replace all removed gaskets and o–
rings.
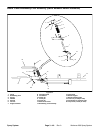
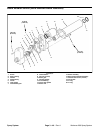
Assembly (Fig. 53)
1. Position ball screw and brake assembly to front
housing. Take care to not disturb brake components.
2. Slide motor, motor gear, and motor seal to front
housing. Secure motor with two (2) hex nuts. Torque
nuts to 70 in–lb (7.9 N–m).
3. Install new o–rings into rear of cover tube. Slide cov-
er tube gasket and cover tube over ball screw.
4. Place washer on ball screw shaft. Position woodruff
key and then slide clutch and second washer onto shaft.
5. Place thick washer, intermediate gear, and thin
washer onto front housing support pin. Make sure that
intermediate gear engages both motor gear and clutch.
6. Position housing gasket to front housing. Slide rear
housing over gears.
7. Secure rear housing:
A. Thread one (1) screw (item 1) through rear hous-
ing and into front housing.
B. Install four (4) washer head screws through cover
tube.
C. Torque screw (item 1) to 20 in–lb (2.3 N–m).
Torque four washer head screws to 70 in–lb (7.9
N–m).
Spray
System
Workman 200 Spray System
Page 3 – 47
Spray System