Virtual Private Networks (VPN) 10-11
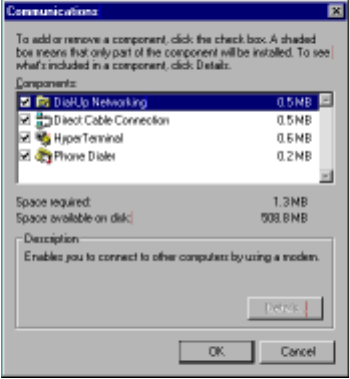
The Communications window appears.
5. In the Communications window, select Dial-Up Networking and click the OK button.
This returns you to the Windows Setup screen. Click the OK button.
6. Respond to the prompts to install Dial-Up Networking from the system disks or CDROM.
7. When prompted, reboot your PC.
CC
CC
rr
rr
ee
ee
aa
aa
tt
tt
ii
ii
nn
nn
gg
gg
aa
aa
nn
nn
ee
ee
ww
ww
DD
DD
ii
ii
aa
aa
ll
ll
--
--
UU
UU
pp
pp
NN
NN
ee
ee
tt
tt
ww
ww
oo
oo
rr
rr
kk
kk
ii
ii
nn
nn
gg
gg
pp
pp
rr
rr
oo
oo
ff
ff
ii
ii
ll
ll
ee
ee
A Dial-Up Networking profile is like an address book entry that contains the information and parameters you
need for a secure private connection. You can create this profile by using either the Internet Connection Wizard
or the Make New Connection feature of Dial-Up Networking. The following instructions tell you how to create the
profile with the Make New Connection feature. Do the following:
1. Double-click the My Computer (or whatever you have named it) icon on your desktop.
Open the Dial-Up Networking folder, and then double-click Make New Connection. The Make New
Connection wizard window appears.
2. Type a name for this connection (such as the name of your company, or the computer you are dialing into).
From the pull-down menu, select the device you intend to use for the virtual private network connection.
This can be any device you have installed or connected to your PC. Click the Next button. A screen appears
with fields for you to enter telephone numbers for the computer you want to connect to.
3. Type the directory number or the Virtual Circuit Identifier number.
This number is provided by your ISP or corporate administrator. Depending on the type of device you are
using, the number may or may not resemble an ordinary telephone directory number.
4. Click the Next button.
The final window will give you a chance to accept or change the name you have entered for this profile. If
you are satisfied with it, click the Finish button. Your profile is complete.


