3-12 User’s Reference Guide
4. Click OK in this window, and the next window. When prompted, reboot the computer.
Note: You can also use these instructions to configure other computers on your network with manual or static
IP addresses. Be sure each computer on your network has its own IP address.
Configuring TCP/IP on Macintosh computers
The following is a quick guide to configuring TCP/IP for MacOS computers. Configuring TCP/IP in a Macintosh
computer requires the following:
■ You must have either Open Transport or Classic Networking (MacTCP) installed.
Note: If you want to use the Dynamic Host Configuration Protocol (DHCP) server built into your Netopia
R310 to assign IP addresses to your Macintoshes, you must be running Open Transport, standard in
MacOS 8, and optional for MacOS 7.5 and above.
■ You must have built-in Ethernet or a third-party Ethernet card and its associated drivers installed in your
Macintosh.
Dynamic configuration (recommended)
If you configure your Netopia R310 using SmartStart, you can accept the dynamic IP address assigned by your
router. The Dynamic Host Configuration Protocol (DHCP), which enables dynamic addressing, is enabled by
default in the router. To configure your Macintosh computer for dynamic addressing do the following:
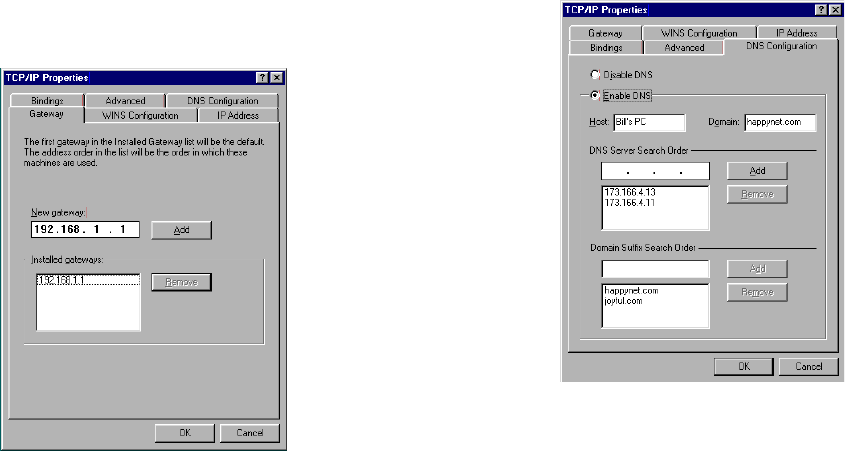
Click on the DNS Configuration tab. Click Enable DNS.
Enter the following
information:
Host: Type the name
you want to give to
this computer.
Domain: Type your
domain name. If you
don't have a domain
name, type your ISP's
domain name; for
example,
netopia.com.
DNS Server Search
Order: Type the
primary DNS IP
address given to you
by your ISP. Click
Add. Repeat this process for the secondary DNS.
Domain Suffix Search Order: Enter the same domain
name you entered above.
3. Click on the Gateway tab (shown below).
Under “New gateway,” enter
192.168.1.1. Click Add. This is the
Netopia R310’s pre-assigned IP address.


