


5-2 User’s Reference Guide
Note about screen differences. Netopia R310 models offering different feature sets will have variations in the
fields on certain screens. For example, there are switched (dial-up ISDN) and leased (Synchronous/Asynchro-
nous and T1) line models, as well as models that offer feature subsets such as SmartIP (Network Address
Translation and DHCP). Your own console screens may look different from those illustrated in this manual.
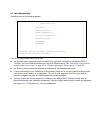
■ The Easy Setup menus display and permit changing the values contained in the default Connection Profile
you created when you ran the SmartStart Wizard for initial configuration. Experienced users can also use
Easy Setup to initially configure the router directly through a console session without using SmartStart.
Easy Setup menus contain up to five descendant screens for viewing or altering these values. The number
of screens depends on whether you have optional features installed.
■ The WAN Configuration menu displays and permits changing your Connection Profile(s), creating or
deleting additional Connection Profiles, and configuring or reconfiguring the manner in which you may be
using the router to connect to more than one service provider or remote site.
■ The System Configuration menus display and permit changing:
■ Network Protocols Setup. See “IP Setup and Network Address Translation” on page 9-1.
■ Filter Sets (Firewalls). See “Security” on page 12-1.
■ IP Address Serving. See “IP Setup and Network Address Translation” on page 9-1.
■ Date and Time. See “Date and Time” on page 7-13.
■ Console Configuration. See “Connecting a local terminal console cable to your router” on page 5-3.
■ SNMP (Simple Network Management Protocol). See “SNMP” on page 11-10.
■ Security. See “Security” on page 12-1.
■ Upgrade Feature Set. See “Upgrade Feature Set” on page 7-15.
■ Logging. See “Logging” on page 7-15.
■ The Utilities & Diagnostics menus provide a selection of seven tools for monitoring and diagnosing the
router's behavior, as well as updating the firmware and rebooting the system. See “Utilities and
Diagnostics” on page 13-1 for detailed information.
■ The Statistics & Logs menus display nine sets of tables and device logs that show information about your
router, your network and their history. See “Statistics & Logs” on page 11-4 for detailed information.
■ The Quick Menus screen is a shortcut entry point to many of the most commonly used configuration
menus that are accessed through the other menu entry points.
■ The Quick View menu displays at a glance current real-time operating information about your router. See
“Quick View status overview” on page 11-1 for detailed information.
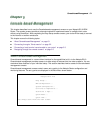
Connecting through a Telnet session
Features of the Netopia R310 may be configured through the console screens.
Before you can access the console screens through Telnet, you must have:
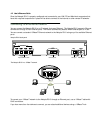
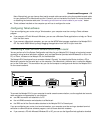
■ a network connection locally to the router or IP access to the router through the WAN port. This could be
the same connection as the one you used with SmartStart and the "Easy" path. If you used the default
configuration for SmartStart, your IP address will be 192.168.1.1.