


WAN and System Configuration 7-3
4. Toggle or enter any IP Parameters you require and return to the Add Connection Profile screen by pressing
Escape. For more information, see “IP Setup and Network Address Translation” on page 9-1.
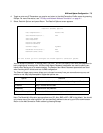
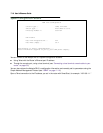
5. Select Datalink Options and press Return. The Datalink Options screen appears.
You can accept the defaults, or change them if you wish. You can also specify user name and password for
both outgoing and incoming calls. the Send User Name/Password parameters are used to specify your
identity when dialing out to a remote location. The Receive User Name/Password parameters are used
when receiving dial-in clients such as via RAS configuration.
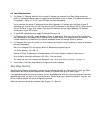
The Channel Usage pop-up menu allows you to choose how many lines your connections may use, and
whether or not they are preemptable. Supported options are:
Note: The Bandwidth Allocation pop-up options are: Off, Auto, BAP or MP+. BAP is the default. You should
only choose one of the other options if you are specifically advised to do so by your ISP or administrator.
Return to the Add Connection Profile screen by pressing Escape.
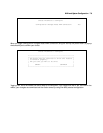
Option Behavior
Dynamic 1 to 3 channels, if available, will be used, depending on traffic volume
1-Channel Only 1 channel will be used
2-Channels 2 channels will be preferred
2-Channel Preemptable 2 channels will be used, but 1 may be reallocated
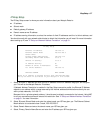
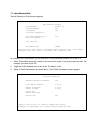
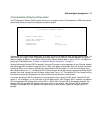
Datalink (PPP/MP) Options
Data Compression... Ascend LZS
Send Authentication... PAP
Send User Name:
Send Password:
Receive User Name:
Receive Password:
Channel Usage... Dynamic
Bandwidth Allocation... BAP
Maximum Packet Size: 1500
In this Screen you will configure the PPP/MP specific connection params.