


Easy Setup 6-5
Easy Setup Profile
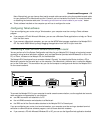
The Easy Setup Connection Profile screen is where you configure the parameters that control the ISDN Netopia
Router’s connection to a specific remote destination, usually another network.
1. Select Number to Dial and enter the ISDN telephone number you received from your ISP. This is the
number the Netopia R310 dials to reach your ISP. Enter the number as you would dial it, including any
required prefixes (such as area, access, and long-distance dialing codes).
If you selected ISDN or Leased as your router’s Circuit Type in the ISDN Easy Setup screen, Number to Dial
will not be an available option.
2. To enable address translation, toggle Address Translation Enabled to Yes. For more information on
Network Address Translation, see Chapter 9, “IP Setup and Network Address Translation.”
Then select the Local WAN IP Address field. The default address is 0.0.0.0, which allows for dynamic
addressing, your ISP assigning an address each time you connect. However, you may enter another
address if you want to use static addressing.
Note: When using HDLC datalink encapsulation and Network Address Translation, you must use a static
address.
3. If your ISP uses Numbered (Interface-based Routing), select Local WAN IP Address and enter the local
WAN address your ISP gave you.
When using numbered interfaces, the Netopia Router will use its local WAN IP address and subnet mask to
send packets to the remote router. Both routers have WAN IP addresses and subnet masks associated
with the connection.
If your ISP uses Unnumbered (System-based Routing), select Remote IP Address and enter the IP address
your ISP gave you. Then select Remote IP Mask and enter the IP subnet mask of the remote site you will
connect to.
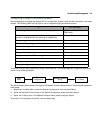
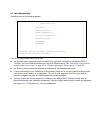
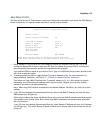
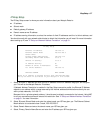
Connection Profile 1: Easy Setup Profile
Number to Dial:
Address Translation Enabled: Yes
Local WAN IP Address: 0.0.0.0
Remote IP Address: 127.0.0.2
Remote IP Mask: 255.0.0.0
PPP Authentication... PAP
Send User Name:
Send Password:
PREVIOUS SCREEN NEXT SCREEN
Enter the directory number for the remote network connection.
Enter basic information about your WAN connection with this screen.