


13-6 User’s Reference Guide
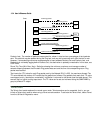
To trace a route, follow these steps:
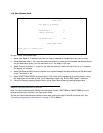
1. Select Host Name or IP Address and enter the name or address of the destination you want to trace.
2. Select Maximum hops (1..64) to set the maximum number of routers to count between the Netopia Router
and the destination router, up to the maximum of 64. The default is 30 hops.
3. Select Timeout per probe (1..10 sec) to set when the trace will timeout for each hop, up to 10 seconds.
The default is 3 seconds.
4. Select Use Reverse DNS to learn the names of the routers between the Netopia Router and the destination
router. The default is Yes.
5. Select START TRACE ROUTE and press Return. The screen will be replaced by a scrolling screen, listing
the destination, the number of hops, the IP addresses of each hop, and the DNS names, if selected.
6. Cancel the trace by pressing Escape. Return to the Trace Route screen by pressing Escape twice.
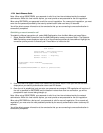
Secure Authentication Monitor
Note: The Secure Authentication Monitor field will remain hidden if PAP-TOKEN or CACHE-TOKEN is not the
selected authentication method in the Connection Profile.
You use the Secure Authentication Monitor screen when placing one type of SecurID connection call. See
“Connecting using security authentication” on page 12-32 for details.
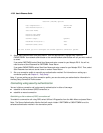
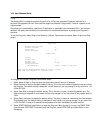
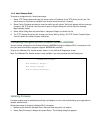
Trace Route
Host Name or IP Address:
Maximum Hops: 30
Timeout (seconds): 5
Use Reverse DNS: Yes
START TRACE ROUTE
Trace route to a network host.