


7–Removal and Replacement
iSR6200 Chassis Blades
7-6 ISR651101-00 G
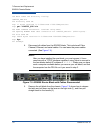
150 Here comes the directory listing.
iSR6200_FRU.bin
226 Directory send OK.
ftp: 17 bytes received in 0.00Seconds 17000.00Kbytes/sec.
ftp>
get iSR6200_FRU.bin
200 PORT command successful. Consider using PASV.
150 Opening BINARY mode data connection for iSR6200_FRU.bin (20010 bytes).
226 File send OK.
ftp: 20010 bytes received in 0.00Seconds 20010000.00Kbytes/sec.
ftp>
bye
221 Goodbye.
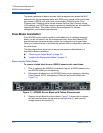
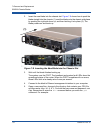
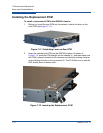
4. Disconnect all cables from the iSR6200 blade. This includes all Fibre
Channel, Ethernet, and serial cables. You can leave the power cables
connected. (See Figure 7-5.)
Figure 7-5. iSR6200 Router Blade with Cables Disconnected
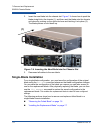
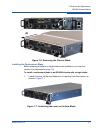
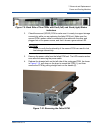
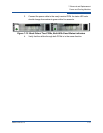
5. Remove the old blade from the chassis. Figure 7-6 shows how to release
the latch and pull down on the lever on the right side (1), and then pull
straight back on the handle (2).
NOTE:
After you have installed the new blade, you must access it. Use a
computer with a TCP/IP interface capable of using Telnet to connect to
the new blades default IP address of 10.0.0.1. Make sure you have
such a computer available before you remove your old blade, and that
the computer has the FRU file on it you saved in step 3.