


Local Operation
88
Setting Overvoltage Protection
Programmable overvoltage protection (OVP) guards your load against overvoltage by crowbarring and downprogramming
the power supply output if the programmed overvoltage setting is exceeded.
A fixed OV circuit with a trip level about 20 percent above the maximum programmable voltage acts as a backup to the
programmable OVP. When overvoltage protection is activated, the output is shorted and the message ’’OVERVOLTAGE’’
will appear on the front panel display.
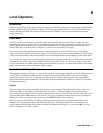
The selected output’s overvoltage setting is programmed locally using the OVSET key. For example, program the
overvoltage to 10.5 volts by pressing:
OVSET 1 0 . 5 ENTER
Resetting Overvoltage Protection
The condition that caused the OVP must first be cleared and then the output can be returned to its previous state by pressing
the RESET key.
Enabling/Disabling Overcurrent Protection
The overcurrent protection feature guards against excessive output currents. When the output goes into the + CC mode and
OCP is enabled, the OCP circuit is activated which downprograms the output voltage and disables the output. For this
condition, the message ’’OVERCURRENT’’ appears on the front panel display.
The selected output’s overcurrent protection feature can be turned on and off from the front panel. The OCP key toggles the
selected output’s overcurrent protection circuit on and off. When it is on (enabled), the OCP ENBLD annunciator will be
on.
Resetting Overcurrent Protection
The condition that activated the OCP circuit must first be cleared and then the output can be returned to its previous state by
pressing the RESET key.
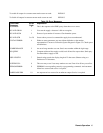
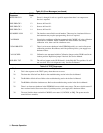
Local Control Of System Functions
The System Function keys consist of the ADDR, ERR, STO, and RCL keys as shown in Figure 6-1. These keys are
independent of the output selected and are used in setting the supply’s GP-IB address, displaying error messages, and
storing/recalling voltage and current settings for all of the supply’s output channels.
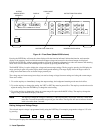
Setting the Supply’s GP-IB Address
As described in page 40, before you can operate the supply remotely, you must know its GP-IB address. You can find this
out locally from the front panel by pressing:
ADDR
The supply’s present address will appear in the display. Address 5 is the factory set address.
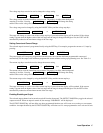
If you want to leave the address set at 5, you can return to the metering mode by pressing the METER key or you can press
another function key.
If you want to change the address, you can enter a new value.
Any integer from 0 through 30 can be selected.