


ENGINE RPM ADJUSTMENT TEST (continued)
ENGINE RPM ADJUSTMENT PROCEDURE
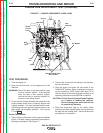
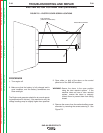
High Idle Adjustment:
IMPORTANT: The high idle RPM is set by the engine
manufacturer, and should not be
changed. If the high idle RPM is not
within the specified range, the engine
should be serviced by a qualified engine
technician.
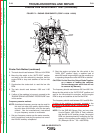
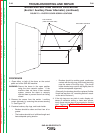
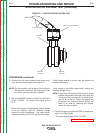
Low idle adjustment:
Code 10856 only:
1. Hold the ball joint housing with a wrench and loosen
the lock nut. Snap the ball joint housing off of the
ball, (some prying may be required) Rotate the ball
joint housing, lengthening or shortening the idle
rod/ball joint assembly as required.
2. Snap the ball joint housing back on the ball and re-
check the RPM. Repeat this adjustment procedure
as needed. When the idle RPM is correct, hold the
ball joint housing with a wrench and tighten the lock
nut.
3. Check that the idle solenoid linkage moves freely
and does not bind. When the solenoid is energized,
the plunger must fully seat against the stop inside
the solenoid coil assembly.
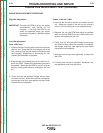
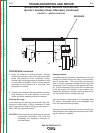
Codes 11199 and 11408:
4. Hold the idle rod with a wrench and loosen the lock
nut. Adjust the length of the idle rod by turning it
onto or out of the ball joint on the injection pump.
5. Recheck the low idle RPM and adjust as needed;
when the low idle RPM is correct, hold the idle rod in
position and tighten the lock nut.
6. Check that the idle solenoid linkage moves freely
and does not bind. When the solenoid is energized,
the plunger must fully seat against the stop inside
the solenoid coil assembly.
7. After the lock nut has been tightened, re-check the
idle RPM.
8. If testing and service is complete, disconnect any
test equipment and close the doors.
TROUBLESHOOTING AND REPAIR
F-24 F-24
SAE-400 SEVERE DUTY
Return to Section TOC Return to Section TOC Return to Section TOC Return to Section TOC
Return to Master TOC Return to Master TOC Return to Master TOC Return to Master TOC