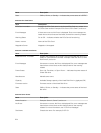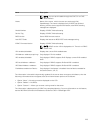
Table 33. LCD Panel Navigational Icons
Icon Normal Icon Highlighted Icon Name and Description
Back — Highlight and press the
center button to return to the
previous screen.
Accept/Yes — Highlight and
press the center button to accept
a change and return to the
previous screen.
Skip/Next — Highlight and press
the center button to skip any
changes and go to the next
screen.
No — Highlight and press the
center button to answer "No" to a
question and go to the next
screen.
Component Identify — Blinks the
blue LED on a component.
NOTE: There is a blinking
blue rectangle around this
icon when Component
Identify is enabled.
A status indicator LED on the LCD panel provides an indication of the overall health of the chassis and its
components.
• Solid blue indicates good health.
• Blinking amber indicates that at least one component has a fault condition.
• Blinking blue is an ID signal, used to identify one chassis in a group of chassis.
Main Menu
From the Main Menu menu, you can navigate to one of the following screens:
• KVM Mapping — Contains the options to map or unmap the KVM to the servers.
• DVD Mapping — This option is displayed on the Main Menu screen only if you a DVD drive installed.
• Enclosure — Displays status information for the chassis.
• IP Summary — Displays information about CMC IPv4, CMC IPv6, iDRAC IPv4, and iDRAC 4 IPv6.
• Settings — Contains the options such as LCD Language, Chassis Orientation, Default LCD Screen,
and the Network Settings.
KVM Mapping Menu
From this screen, you can view the KVM to server mapping information, map another server to the KVM,
or unmap the existing connection. To use the KVM for a server, select KVM mapping from the main
menu, navigate to the appropriate server, and then press the center Check button.
218


