


Installation and Configuration 88
• As an alternative, you can log on to the SP Switch Router and use a
UNIX editor to enter the parameters in the /etc/grdev1.conf file.
5. Reboot the SP Switch Router unit so that the altered configuration files are
installed and used. Remember that you must use
grwrite -v to preserve
the modifications of files in /etc, before a
reboot.
Details about each step are provided in the next sections.
3.8 Step 1. Check SNMP in the SP Switch Router System
Check the /etc/snmpd.conf file to see if a management station and community
are defined, and if traps are enabled. Network monitoring devices
(management stations) can request or access the SP Switch Router’s SNMP
information.
Follow the procedure described in Chapter 2, "How to configure SNMP" of the
GRF Configuration Guide 1.4,
GA22-7366. Note that you
must not remove
the ALLOW and COMMUNITY public statements that are already in /etc/
snmpd.conf.
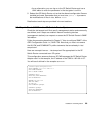
Here are excerpts from our /etc/snmpd.conf file appropriate for the SP
Switch Router connected to an SP system.
This configuration assumes that one SP CWS manages the SP Switch Router
Adapter card. In the example, the IP address of the CWS is 192.168.4.137.
You will see it defined in the example as
MANAGER.
# Default Agent Configuration File
ALLOW SUBAGENT 1.3.6.1.4.1.1080.1.1.1
WITH OTHER PASSWORD
USE 15 SECOND TIMEOUT
COMMUNITY public
ALLOW GET, TRAP OPERATIONS
USE NO ENCRYPTION
MANAGER 192.168.4.137
SEND ALL TRAPS
TO PORT 162
WITH COMMUNITY spenmgmt
COMMUNITY spenmgmt
ALLOW ALL OPERATIONS
USE NO ENCRYPTION