


ProSecure Unified Threat Management UTM10 or UTM25 Reference Manual
5-42 Firewall Protection
v1.0, September 2009
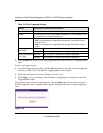
Setting up IP/MAC Bindings
IP/MAC Binding allows you to bind an IP address to a MAC address and vice-versa. Some PCs or
devices are configured with static addresses. To prevent users from changing their static IP
addresses, the IP/MAC Binding feature must be enabled on the UTM. If the UTM detects packets
with a matching IP address but with the inconsistent MAC address (or vice-versa), the packets are
dropped. If you have enabled the logging option for the IP/MAC Binding feature, these packets are
logged before they are dropped. The UTM displays the total number of dropped packets that
violate either the IP-to-MAC binding or the MAC-to-IP binding.
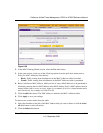
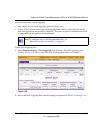
As an example, assume that three computers on the LAN are set up as follows:
• Host1: MAC address (00:01:02:03:04:05) and IP address (192.168.10.10)
• Host2: MAC address (00:01:02:03:04:06) and IP address (192.168.10.11)
• Host3: MAC address (00:01:02:03:04:07) and IP address (192.168.10.12)
If all of the above host entry examples are added to the IP/MAC Binding table, the following
scenarios indicate the possible outcome.
• Host1: Matching IP & MAC address in IP/MAC Table.
• Host2: Matching IP but inconsistent MAC address in IP/MAC Table.
• Host3: Matching MAC but inconsistent IP address in IP/MAC Table.
In this example, the UTM blocks the traffic coming from Host2 and Host3, but allows the traffic
coming from Host1 to any external network. The total count of dropped packets is displayed.
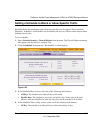
To set up IP/MAC bindings:
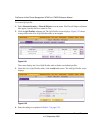
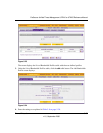
1. Select Network Security > Address Filter from the menu. The Address Filter submenu tabs
appear, with the Source MAC Filter screen in view.
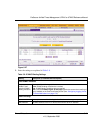
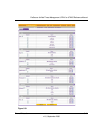
2. Click the IP/MAC Binding submenu tab. The IP/MAC Binding screen displays (see
Figure 5-27 on page 5-43, which shows some bindings in the IP/MAC Binding table as an
example).
Note: You can bind IP addresses to MAC addresses for DHCP assignment on the LAN
Groups submenu. See “Managing the Network Database” on page 4-13.