


ProSecure Unified Threat Management UTM10 or UTM25 Reference Manual
Using the Setup Wizard to Provision the UTM in Your Network 2-29
v1.0, September 2009
What to Do Next
You have completed setting up and deploying the UTM to the network. The UTM is now ready to
scan the protocols and services that you specified and perform automatic updates based on the
update source and frequency that you specified.
If you need to change the settings, or to view reports or logs, log in to the UTM Web Management
Interface, using the default IP address or the IP address that you assigned to the UTM in “Setup
Wizard Step 1 of 10: LAN Settings” on page 2-8.
The UTM is ready for use. However, some important tasks that you might want to address before
you deploy the UTM in your network are listed below:
• “Configuring the WAN Mode (Required for the UTM25’s Dual WAN Mode)” on page 3-9.
• “Configuring VPN Authentication Domains, Groups, and Users” on page 9-1.
• “Managing Digital Certificates” on page 9-17.
• “Using the IPsec VPN Wizard for Client and Gateway Configurations” on page 7-3.
• “Using the SSL VPN Wizard for Client Configurations” on page 8-2.
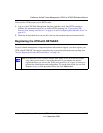
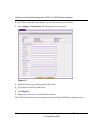
Note: When you reset the UTM to the original factory default settings after you have
entered the license keys to activate the UTM (see “Registering the UTM with
NETGEAR” on page 2-27), the license keys are erased. The license keys and the
different types of licenses that are available for the UTM are no longer displayed
on the Registration screen. However, after you have reconfigured the UTM to
connect to the Internet and to the NETGEAR registration server, the UTM
retrieves and restores all registration information based on its MAC address and
hardware serial number. You do not need to re-enter the license keys and re-
activate the UTM.