


ProSecure Unified Threat Management UTM10 or UTM25 Reference Manual
3-24 Manually Configuring Internet and WAN Settings
v1.0, September 2009
4. Click Apply to save your changes.
Additional WAN-Related Configuration Tasks
• If you want the ability to manage the UTM remotely, enable remote management (see
“Configuring Remote Management Access” on page 10-12). If you enable remote
management, NETGEAR strongly recommend that you change your password (see “Changing
Passwords and Administrator Settings” on page 10-9).
• You can set up the traffic meter for each WAN, if desired. See “Enabling the WAN Traffic
Meter” on page 11-1.
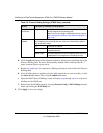
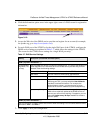
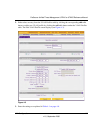
Use this MAC Address Select the Use this MAC Address radio button to manually enter the
MAC address in the field next to the radio button. You would typically enter
the MAC address that your ISP is requiring for MAC authentication.
Note: The format for the MAC address is 01:23:45:67:89:AB (numbers 0-9
and either uppercase or lowercase letters A-F). If you enter a MAC
address, the existing entry is overwritten.
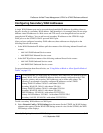
Upload/Download Settings
These settings rate-limit the traffic that is being forwarded by the UTM.
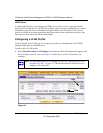
WAN Connection Type From the pull-down menu, select the type of connection that the UTM uses
to connect to the Internet: DSL, ADLS, Cable Modem, T1, T3, or Other.
WAN Connection Speed
Upload
From the pull-down menu, select the maximum upload speed that is
provided by your ISP. You can select from 56 Kbps to 1 Gbps, or you can
select Custom and enter the speed in Kbps in the field to the right.
WAN Connection Speed
Download
From the pull-down menu, select the maximum download speed that is
provided by your ISP. You can select from 56 Kbps to 1 Gbps, or you can
select Custom and enter the speed in Kbps in the field to the right.
Note: Depending on the changes that you make, when you click Apply, the UTM
might restart, or services such as HTTP and SMTP might restart.
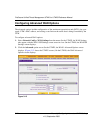
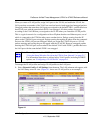
Note: For the UTM25 only, to configure advanced WAN options for WAN2 port, select
Network Config > WAN Settings from the menu. The WAN Settings tabs appear,
with the WAN1 ISP Settings screen in view. Now, click the WAN2 ISP Settings
tab and then the Advanced option arrow. The WAN2 Advanced Options screen
displays.
Table 3-8. Advanced WAN Settings (continued)
Setting Description (or Subfield and Description)