


ProSecure Unified Threat Management UTM10 or UTM25 Reference Manual
8-14 Virtual Private Networking Using SSL Connections
v1.0, September 2009
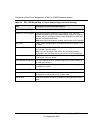
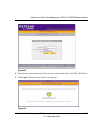
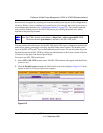
Verify your settings; if you need to make any changes, click the Back action button (if needed
several times) to return to the screen on which you want to make changes.
Click Apply to save your settings. If the settings are accepted by the UTM, a message “Operation
Succeeded” appears at the top of the screen, and the “Welcome to the Netgear Configuration
Wizard” screen displays again (see Figure 8-1 on page 8-2).
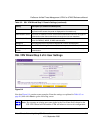
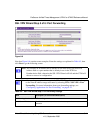
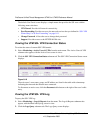
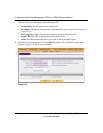
Accessing the New SSL Portal Login Screen
All screens that you can access from the SSL VPN menu of the Web Management Interface
display a user portal link at the right upper corner, above the menu bars ( ).
When you click on the user portal link, the SSL VPN default portal opens (see Figure 8-9 on page
8-15.) This user portal is not the same as the new SSL portal login screen that you defined with the
help of the SSL VPN Wizard.
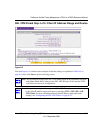
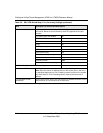
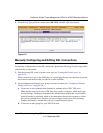
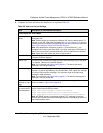
To open the new SSL portal login screen:
1. Select VPN > SSL VPN from the menu. The SSL VPN submenu tabs appear, with the Policies
screen in view.
2. Click the Portal Layouts submenu tab. The Portal Layout screen displays (see Figure 8-12 on
page 8-19).
3. In the Portal URL field of the List of Layouts table, click on the URL that ends with the portal
layout name that you defined with the help of the SSL VPN Wizard. The new SSL portal login
screen displays (see Figure 8-8 on page 8-15).