


ProSecure Unified Threat Management UTM10 or UTM25 Reference Manual
8-4 Virtual Private Networking Using SSL Connections
v1.0, September 2009
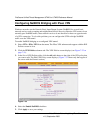
Note: After you have completed the steps in the SSL VPN Wizard, you can make changes
to the portal settings by selecting VPN > SSL VPN > Portal Layout. For more
information about portal settings, see “Creating the Portal Layout” on page 8-18.
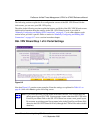
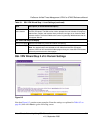
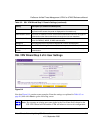
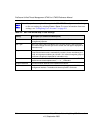
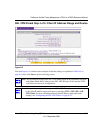
Table 8-1. SSL VPN Wizard Step 1: Portal Settings
Item Description (or Subfield and Description)
Portal Layout and Theme Name
Portal Layout
Name
A descriptive name for the portal layout. This name is part of the path of the SSL VPN
portal URL.
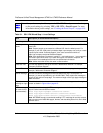
Note: Custom portals are accessed at a different URL than the default portal. For
example, if your SSL VPN portal is hosted at https://vpn.company.com, and you create
a portal layout named “CustomerSupport”, then users access the sub-site at
https://vpn.company.com/portal/CustomerSupport.
Note: Only alphanumeric characters, hyphens (-), and underscores (_) are accepted in
the Portal Layout Name field. If you enter other types of characters or spaces, the
layout name is truncated before the first non-alphanumeric character.
Note: Unlike most other URLs, this name is case-sensitive.
Portal Site Title The title that appears at the top of the user’s Web browser window. For example,
“Company Customer Support”
Banner Title The banner title of a banner message that users see before they log in to the portal. For
example, “Welcome to Customer Support.”
Banner Message The text of a banner message that users see before they log in to the portal. For
example, “In case of login difficulty, call 123-456-7890.” Enter a plain text message or
include HTML and Java script tags. The maximum length of the login page message is
4096 characters.
Display banner
message on login
page
Select this checkbox to show the banner title and banner message text on the login
screen as shown in Figure 8-8 on page 8-15.
HTTP meta tags
for cache control
(recommended)
Select this checkbox to apply HTTP meta tag cache control directives to this portal
layout. Cache control directives include:
<meta http-equiv=”pragma” content=”no-cache”>
<meta http-equiv=”cache-control” content=”no-cache”>
<meta http-equiv=”cache-control” content=”must-revalidate”>
Note: NETGEAR strongly recommends enabling HTTP meta tags for security reasons
and to prevent out-of-date Web pages, themes, and data being stored in a user’s Web
browser cache.