


ProSecure Unified Threat Management UTM10 or UTM25 Reference Manual
LAN Configuration 4-13
v1.0, September 2009
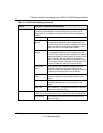
Some advantages of the Network Database are:
• Generally, you do not need to enter either IP address or MAC addresses. Instead, you can just
select the name of the desired PC or device.
• There is no need to reserve an IP address for a PC in the DHCP server. All IP address
assignments made by the DHCP server are maintained until the PC or device is removed from
the Network Database, either by expiration (inactive for a long time) or by you.
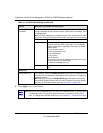
• There is no need to use a fixed IP address on a PCs. Because the IP address allocated by the
DHCP server never changes, you do not need to assign a fixed IP address to a PC to ensure it
always has the same IP address.
• A PC is identified by its MAC address—not its IP address. The Network Database uses the
MAC address to identify each PC or device. Therefore, changing a PC’s IP address does not
affect any restrictions applied to that PC.
• Control over PCs can be assigned to groups and individuals:
– You can assign PCs to groups (see “Managing the Network Database” on this page) and
apply restrictions (outbound rules and inbound rules) to each group (see “Using Rules to
Block or Allow Specific Kinds of Traffic” on page 5-3).
– You can select groups that are allowed access to applications, Web categories, and URLs
that you have blocked for all other users, or the other way around, block access to
applications, Web categories, and URLs that you have allowed access to for all other users
(see “Setting Web Access Exceptions and Scanning Exclusions” on page 6-41).
– If necessary, you can also create firewall rules to apply to a single PC (see “Enabling
Source MAC Filtering” on page 5-40). Because the MAC address is used to identify each
PC, users cannot avoid these restrictions by changing their IP address.
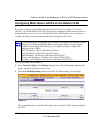
Managing the Network Database
You can view the Network Database, manually add or remove database entries, and edit database
entries.
To view the Network Database:
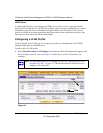
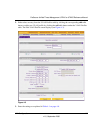
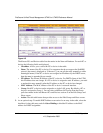
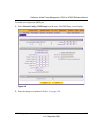
1. Select Network Config > LAN Settings from the menu. The LAN Settings submenu tabs
appear, with the LAN Setup screen in view.
2. Click the LAN Groups submenu tab. The LAN Groups screen displays (see Figure 4-5 on
page 4-14, which shows some examples in the Known PCs and Devices table).