


ProSecure Unified Threat Management UTM10 or UTM25 Reference Manual
3-16 Manually Configuring Internet and WAN Settings
v1.0, September 2009
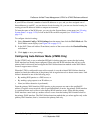
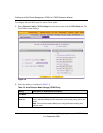
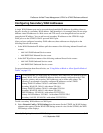
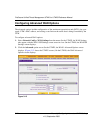
b. Click the add table button in the rightmost column to add the protocol binding rule to the
Protocol Binding table. The rule is automatically enabled, which is indicated by the “!”
status icon that displays a green circle.
c. Repeat step a and step b for each protocol binding rule that you want to add to the Protocol
Binding table.
d. If not all table entries are enabled, select the table entries that you want to enable, or click
the select all table button. Then, click the enable table button.
e. Open the WAN2 Protocol Bindings screen and repeat step a through step d to set protocol
bindings for the WAN2 port.
f. Return to the WAN Mode screen by selecting Network Config > WAN Settings from the
menu and clicking the WAN Mode tab.
4. Click Apply to save your settings.
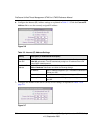
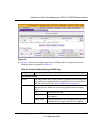
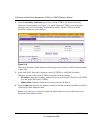
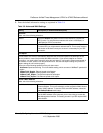
Source Network
(continued)
Group 1–Group 8 If this option is selected, the rule is applied to the devices
that are assigned to the selected group.
Note: You may also assign a customized name to a group
(see “Changing Group Names in the Network Database” on
page 4-16).
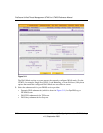
Destination
Network
The destination network settings determine which Internet locations (based on
their IP address) are covered by the rule. Select one of the following options
from the pull-down menu:
Any All Internet IP address.
Single address In the Start Address field, enter the IP address that is
covered by the rule.
Address range In the Start Address field and End Address field, enter the
IP addresses for the range that is covered by the rule.
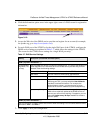
Table 3-6. Protocol Binding Settings (UTM25 Only) (continued)
Setting Description (or Subfield and Description)