


84 4 Tool Management
4.2 Tool Data
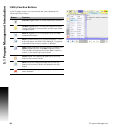
Fixture Offsets - Tool menu
In the Tool menu bar, the Fixture Offset display screen is provided to
allow data entry in the display fields to set fixture offsets.
Touch the Fixture Offsets button to open the offsets
menu.
With the display screen open, data can now be entered, or edited by
changing existing information.
Press the UP or DOWN arrow keys to select a offset line number
(the entire row is highlighted).
To add, or change information, select the column, X, Y, or Z where
the data is to be entered using the RIGHT or LEFT arrow keys.
Press the Enter key to activate the field in the required column.
Use the numeric keys to enter the required data. Use the Back Space
or Clear button to delete previously entered data.
Press the Enter button to save the data entered in the field.
Tool Life Management
Tool Life Management is a feature that tracks the lifetime use of a tool
while the spindle is running and the system is in feed mode. Based on
parameters set by the user, it verifies if a tool is valid prior to mounting
and disables a tool once it has worn beyond its useful life. Tool Life
Management parameters are accessed in the Tool Table.
When a program starts running, the active tool must have its Tool Life
Management activated so that any machining done with it can be
tracked. If a replacement tool is specified in the (RT) column, it should
also have Tool Life Management active.
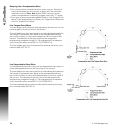
Activate Tool Life Management
In the Tool Table, select the tool to be managed.
Enter the maximum tool life in minutes in the “Time1” column.
Enter the maximum in use tool life in minutes in the “Time2”
column.
If a replacement tool has been specified in the “RT” column, enter
in the “Time1”, and “Time2” for the replacement tool also.
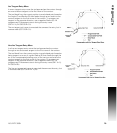
When a tool’s usage limits have been exceeded, the tool is locked. If
a replacement tool (“RT”) has not been specified, “Time1” or
“Time2” will cause the program to stop. An error message will
appear.