


8-1
Chapter 8 SXYX
1 Installation
WARNING
Always turn the controller power OFF before installing the robot. Serious
accidents might occur if the robot starts to operate during installation.
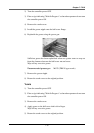
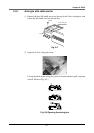
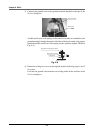
The SXYX is installed with one of the following two methods.
Method A : Open through holes on the installation base and install with M6 bolts
from below.
(M6 tap holes are opened on the bottom of the robot.)
Method B : Tap holes into the installation base and secure the robot with M6
bolts from the inside of the robot.
1-1 Installation bolt types
• Use the following type of installation bolt.
Hexagon socket head cap screw M6 Strength 8.8T
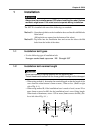
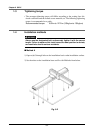
1-2 Installation bolt nominal length
!
CAUTION
Do not use washers or spring washers with the tightening bolt.
The bolt head could interfere with the linear guide’s bearings and be damaged.
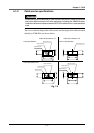
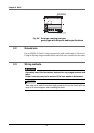
• When using method A, determine the nominal length so that the length of the
screw from the robot bottom is 9mm or more, 27mm or less. (Refer to right
side of Fig. 8-1.)
• When using method B, if the installation base is made of steel, secure 1D or
more (6mm or more for M6) for the installation base's screw fitting length.
When made of aluminum, secure 1.5D or more (9mm or more for M6). (Re-
fer to left side of Fig. 8-1.)
9
10 17
Fig. 8-1