


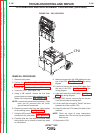
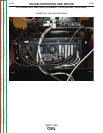


1. Make sure the stand, the monitor, the VR
GMAW/FCAW gun and the VR SMAW device
are properly connected to the unit and are not
damaged.
2. Connect the external speakers if available.
3. Connect the machine to the 115 – 230VAC
power source.
4. Using the green circular push button turn on the
Vertex
TM
‘360. Keep the button depressed for at
least 3 seconds.
5. When the unit has “booted-up” proceed with
login. See Operation Section of this manual.
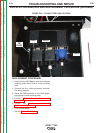
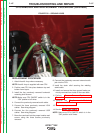
6. Insert a USB memory device into the USB port
on the front of the machine
7. Navigate through the following: See the
Operation Section of this manual.
a. Select coupon – must match actual coupon in
arm.
b. Select 3/8 inch thickness.
c. Using the process selector switch select GMAW
d. Proceed with settings. See the Default Weld
Process Settings
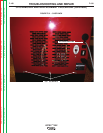
8. Check the functionality of all the push buttons
and lights. They must function as labeled.
Listen for an audible signal when buttons are
pressed.
9. Check the functionality of the VR GMAW/FCAW
gun in all positions and with every coupon.
When welding there must be visual and audio
information in the helmet. If external speakers
are used there must be audio information when
welding.
10. Check all three different views using the right
and left white screen select arrow keys.
11. Make certain that weld pass information can be
saved in the USB memory device. See the
Operation Section of this manual.
12. Press the RED rectangular push button and
then using the joystick select “Change
Process”. Select “Yes”.
13. Navigate through the following: See the
Operation Section of this manual.
a. Select coupon – must match actual coupon in
arm.
b. Select 3/8 inch thickness.
c. Using the process selector switch select VR
SMAW
d. Proceed with settings. See the Default Weld
Process Settings
14. Check the functionality of the VR SMAW
device in all positions and with every coupon.
When welding there must be visual and audio
information in the helmet. If external speakers
are used there must be audio information when
welding.
15. Physically rotate the stick device to 45 degrees
position. The stick picture in the helmet must
follow the actual movements.
16. Select “New Stick”. The physical stick should
fully extend in the VR SMAW device. See the
Operation Section of this manual.
17. Press the RED rectangular push button and
then using the joystick select “Logout”. Select
“Yes”. Login screen with keyboard appears.
18. Turn the key switch 90 degrees to the right.
The instructor mode screen should appear.
Check the update function for USB readiness.
19. Press the RED rectangular push button and
then using the joystick select “Shutdown”.
Select “Yes”.
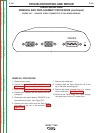
RETEST AFTER REPAIR
F-110 F-110
VRTEX
TM
360
DESCRIPTION
This procedure will aid the technician in testing the basic operations of the Vertex
TM
360 after
any repair or replacement procedure has been completed.
Return to Section TOC Return to Section TOC Return to Section TOC Return to Section TOC
Return to Master TOC Return to Master TOC Return to Master TOC Return to Master TOC