


OPERATION
B-7 B-7
VRTEX
TM
360
When setting up the virtual equipment, the user must
set the welding parameters (e.g. wire feed speed for
VR GMAW) within the ranges set in the tolerance edi-
tor. The system ships with Lincoln default tolerances.
Lincoln default tolerances can be reviewed in the toler-
ance editor, or refer to the Default Weld Process
Settings Chart (if using the default settings) located in
this manual. The WPSʼs are also available on
www.VRTEX360.com. However, users can set and
use their own tolerances for teaching beginner
welders. The tolerances also determine how the user
is scored on such parameters as work angle, travel
angle, travel speed, position, and contact tip to work
distance or arc length.
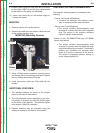
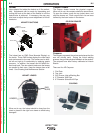
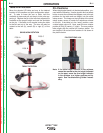
GREEN CIRCULAR BUTTON LOCATION
Software will step the user through the following setup
screens:
• Login
• Joint configuration selection
• Process selection
• Stand set up
• Environment
• Gas set up
• Weld machine settings
• Instructorʼs view
• Welderʼs view
• LASER (Live Action Student Evaluation Report)
The key provided with the system allows the user to
access additional information and set-up pages.
• Weldometer
TM
• Tolerance Editor
• Options
• Update
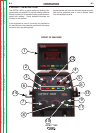
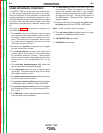
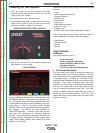
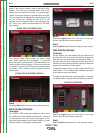
Login Screen:
Overview
This page allows the user to:
• Enter Username
• Select Language Preference
• Select Imperial or Metric Units
• Shutdown System
• Continue to the next Setup Screen
1. On Screen Keyboard
The user enters their name by using the joystick and
red select button on the VR weld machine. The joy-
stick allows the user to navigate the keyboard graphic
to highlight letters. Pressing the red select button
enters the letter highlighted into the enter name box as
indicated. The virtual keyboard starts with shift
enabled, so the first letter is automatically capitalized.
The user can select shift or lock (equivalent to caps
lock on a standard keyboard) at any time. If the user
makes a mistake, they can select the back arrow to
delete the last character entered. Once the user
enters their name, they should press the green panel
button to continue.
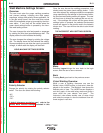
LOGIN SCREEN
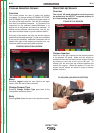
4. Your system will start up.
5. Wait a few minutes until your system displays the
login screen on your monitor.
Powering Up Your System:
1. After you have set up the hardware and have
become familiar with the user controls, you will be
ready to use your system.
2. Plug power cord into a standard outlet.
3. Press and hold the green circular button on the front
panel until it lights up and you hear fans running
inside the machine. (approx. 3 seconds)
Return to Section TOC Return to Section TOC Return to Section TOC Return to Section TOC
Return to Master TOC Return to Master TOC Return to Master TOC Return to Master TOC