


Configuration, Startup, and Operation
of Recorder with Display
12/03 DR4300 Circular Chart Recorder Product Manual 105
4.3.14 Timer Set Up Group
Introduction
The timer option allows you to configure a timeout period and to select the timer start by either the
keyboard (Increment or Decrement key) or Alarm 1. The optional digital input can also be configured to
the start the timer. The timer display is selectable as either “time remaining” or “elapsed time”.
Alarm 2 is activated at the end of the timeout period. When the timer is enabled, it has exclusive control of
the Alarm 2 relay; any previous Alarm 2 configuration is ignored. At timeout, the timer is ready to be
activated again by whatever action has been configured. Relay 2 will remain energized until the timer is
reset.
See Subsection 4.5.2.7 for operation of timer.
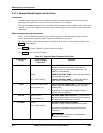
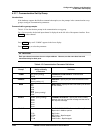
Timer group prompts
Table 4-12 lists all the function prompts in the timer setup group and their definitions.
Press SET UP
key until “TIMER” appears in the lower display.
Press FUNC
key to display parameters.
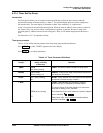
Table 4-12 Timer Parameter Definitions
Lower Display
Prompt
Upper Display
Range of Setting
or Selection
Parameter
Definition
TIMER
ENAB
DIS
[factory setting]
TIMER - Use this to enable or disable the timer option.
PERIOD
0:00 to 99:59
[factory setting = 0]
PERIOD - Configure the length of the timeout period (from
0 to 99 hours, 59 minutes).
START
KEY [factory setting]
AL1
START - Select whether the Timer starts with the keyboard
(Increment or Decrement key) or Alarm 1.
L DISP
TREM
[factory setting]
ET
L DISP - Select whether time remaining (TREM) or
elapsed time (ET) is displayed for the timer option.
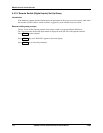
r
The time is shown on the lower display in hh:mm format
along with a rotating “clock” character.
Time remaining: If the “clock” rotation is clockwise, elapsed
time is indicated.
Elased time: If the “clock” rotation is counterclockwise,
time left is indicated.