


DR4300 Circular Chart Recorder
138 DR4300 Circular Chart Recorder Product Manual 12/03
4.5.2.7 Starting the Timer
Introduction
The DR4300 is available with an optional timer. This timer can be configured to be started by Alarm 1 or
the keypad. (If the recorder supports digital inputs, one can be used to trigger the timer. This remote
switch is independent of whether the timer is configured to start with the alarm or the keypad.)
Once the timer has been started, it cannot be stopped with the Increment and Decrement keys (see Step 3
below).
At the end of timer period Relay 2 will be energized, and remain energized until the timer is reset.
• If the timer set up group parameter START = KEY, then restarting the timer will involve pushing the
Increment or Decrement key twice while the timer is displayed: once to reset the timer and de-
energize Relay 2, and the second to start the timer.
• If the timer set up group START = AL1, then when Alarm 1 toggles (goes inactive, then active again)
the timer is reset and restarted. When the timer is configured to start via Alarm 1, the timer can be
reset (but not restarted) with the Increment or Decrement key. If the Alarm 1 relay is still energized
when you reset the timer with the key, then the timer will be restarted immediately.
Procedure
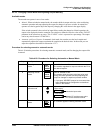
Use the procedure in Table 4-34 to start the timer.
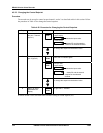
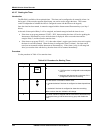
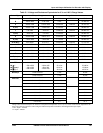
Table 4-34 Procedure for Starting Timer
Step Press Action/Result
1
DISP
until you see
n.nn where n.nn is:
• 0.00 if the timer is configured to show elapsed
time, or
• the hours and minutes set on the timer if it is
configured to show time remaining.
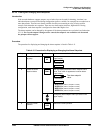
2
or
You will see the “clock hand” start to move:
• counterclockwise if the timer is configured to show elapsed time,
or
• clockwise if the timer is configured to show time remaining.
After a minute, the time indication will change.
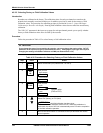
3
The timer cannot be stopped with the Increment or Decrement key.
To stop the timer go into the timer set up group and disable the
timer.