


Troubleshooting and Pen Alignment
of Recorder without Display
12/03 DR4300 Circular Chart Recorder Product Manual 169
7.4 Alignment of Pen at Zero and 100 %
Procedure
You can align the pens to the zero and 100 % positions on the chart using the procedure in Table 7-6.
If humidity causes the chart to change size, repeat the procedure as needed.
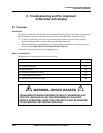
WARNING
SHOCK HAZARD
When the unit is powered a potentially lethal shock hazard exists at the AC line connections at TB1 on
each printed circuit assembly (behing the chart plate). Make sure the unit power is disconnected before
starting the procedure. More than one switch may be required to de-energize the recorder.
Failure to observe this precaution can result in exposure to a potentially lethal shock hazard.
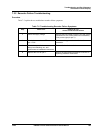
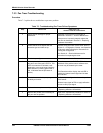
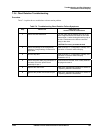
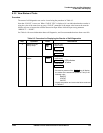
Table 7-6 Procedure for Pen Alignment
Step Action Graphic
1
Place run switch SW5 to the setup position (toward the top of
the board) on the pen’s PCA.
See Figure 3-1 for location of SW5 (to
the right of TB1).
2
Press SW3 and SW4 simultaneously and release them.
The pen will move downscale toward the hub and be
positioned at the previously set 0 % point on the chart within
approximately 10 seconds.
See Figure 3-1 for location of SW3 and
SW4.
If the pen tip is greatly out of position, follow Steps 3 through 7. (Unless a pen arm has been replaced, this
probably will not be necessary.) If pen position requires only minor adjustment, go to Step 8.
3
Turn off the power to the recorder before the pen begins to
move upscale (approximately 10 seconds).
4
To place the pen tips in approximately the correct position,
loosen the screw holding the pen 1 arm to the servo shaft
and move the pen arm to access the locking screw for the
pen 2 arm (if applicable).
5
Align the tip of pen 2 with the zero line on the chart and
tighten the locking screw.
6
Align the tip of pen 1 with the zero line on the chart and
tighten the locking screw.
7
Turn on the power and repeat Step 2.
8
To fine-tune the alignment of a pen, press the raise switch
SW4 or lower switch SW3 on its PCA until the pen tip is
aligned with the zero line on the chart.
Approximately 10 seconds after the last press of the raise or
lower switch the pen will move to the previously set 100 %
point.
See Figure 3-1 for the location of SW3
and SW4.