


DR4300 Circular Chart Recorder
120 DR4300 Circular Chart Recorder Product Manual 12/03
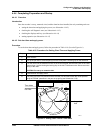
4.4.2 Preparing the Recorder for Startup
Introduction
Before applying power to the recorder, complete these preparation tasks.
ATTENTION
Never move the pen arms when the unit is operating unless adjusting the pen alignment as
described in Section 8.
WARNING
SHOCK HAZARD
When the unit is powered a potentially lethal shock hazard exists at the AC line connections at TB1 on
each printed circuit assembly (behing the chart plate). Make sure the unit power is disconnected before
starting the procedure. More than one switch may be required to de-energize the recorder.
Failure to observe this precaution can result in exposure to a potentially lethal shock hazard.
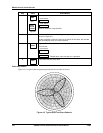
Procedure
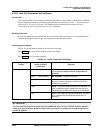
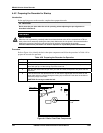
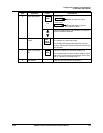
Refer to Figure 4-4 to identify the basic chart plate components and follow the procedure in Table 4-20 to
prepare the recorder for operation.
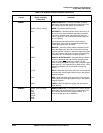
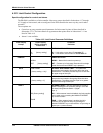
Table 4-20 Preparing the Recorder for Operation
Step Action
1
Open the door of the recorder.
2
Pull up on the pen lifter to raise the pen(s) from the chart plate and remove the protective cap
from each pen tip. Lift the locking clip on the chart hub.
3
Slip the new chart under the pen lifter, pen and time index, and press it into place over the
chart hub.
4
Turn the chart until the desired time line on the chart is aligned with the time index on the
chart plate and pen 1 before closing the locking clip on the hub. Push down on the lifter to
return the pen(s) to the chart.
CAUTION: Do not try to rotate the hub
24213
Time index
Large chart
hub
Pen lifter
Figure 4-4 Basic Chart Plate Components