


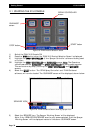
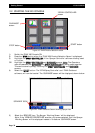
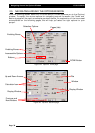


SSeelleeccttiinngg-
means selecting an item by ‘touching’ the screen with your finger (or mouse if
connected to the ZYNX Console). There are various ways of selecting the different options.
11-
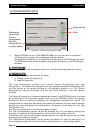
To select a ‘Pr. Sense’ option, you would touch the screen either on the ‘white box’ or
where ‘Tank 1’ is written, when selecting a ‘tick’ will appear in the box.
22-
To select an option within the ‘Tank 1 Mode’ window, you would ‘touch’ the screen i.e
‘Liquid’, where the ‘Liquid’ is written, once selected a ‘black dot’ will be displayed next to
‘Liquid’.
33-
‘Buttons’ are areas on the page, rectangular in shape, with the option written within the
box or icon displayed. Examples of ‘Buttons’ on the page are: i.e ‘DONE’, ‘Settings’ ,
‘Calculator Icon’, ‘Previous’ and ‘Next’. To select the ‘Button’ touch the area within the outline
of the box, of the ‘Button’ required. Once the ‘Button’ is selected it usually opens another
‘window’; except for the ‘DONE’ button which closes the ‘Options’ window.
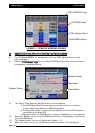
PPaaggeess-
Within the ‘Options’ window there are 12 Pages (or 11 Pages) , they are: ‘GPS (this
Page is only displayed if the Guidance or Variable Rate Control is selected with Spray Rate
Controller ’; ECU’; ‘Tanks’; ‘Sections’; ‘Switches’; ‘Sensors’; ‘Setup’; ‘Units’; ‘Alarms’; ‘Presets;
‘Sim. (Simulation)’ and ‘Other’.
The operators manual starts on the ‘GPS’ page and explains all the options on that page then,
moves in sequence by selecting the ‘Next’ button, from page ‘1’ through to ‘12’.
To select another page ‘touch’ the tab of the page required. Eg. To select the ‘Switches’ page,
then ‘touch’ the part of the screen where it says ‘Switches’, the ‘Switches’ page will be
displayed.
OR
Select the ‘Next’ button to advance to the next page, each time the button is selected it will
advance one page. The ‘Previous’ button goes back one page each time the button is
selected.
You may EXIT back to the ‘Working Screen’ from any page by selecting the ‘DONE’ button.
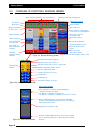
TTiittlleess
aanndd
WWiinnddoowwss-
Then each ‘Page’ is broken into areas called ‘windows’, these areas are
bordered by a thin grey line, each of these ‘windows’ has a ‘title’ which gives a description of
the options available in that window.
EEnnaabblliinngg
BBooxxeess-
Are ‘options’ identified with square white boxes lying next to the written
option. Examples of Enabling Boxes are: ‘Pr. Sense’, ‘Tanks and ‘Valves’. The option is selected
when there is a ‘tick’ present in the white box. An ‘Enabling box’ can be selected or not
selected or you can select some or all of the options. In the example of ‘Pr. Sense’ if you have
a ‘Electronic Pressure Sensor’ connected to the system, then you would select the option by
placing a ‘tick’ in the box. If no ‘Electronic Pressure Sensor’ was connected to the system then
you would leave the box blank.
In the ‘Tanks’ window you have 3 options ‘Tank 1’, ‘Tank 2’ and ‘Tank 3’; you can select 1 or
2 of the options or all the options depending on your system setup, by placing a ‘tick’ next to
the options required.
Page 39
V1.98 21/06/06
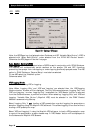
Navigating Around the Options Window