


Setting Up -Pressure Sensor
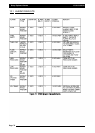
17.1 PRESSURE SENSOR
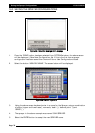
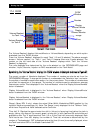
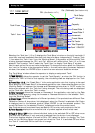
Note:The ‘Pressure Readout’ display, is only displayed if ‘Pr. Sensor’ is selected in
OPTIONS/SPRAYER and an electronic pressure sensor is installed on the sprayer.
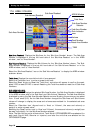
The number in the top left hand side of the ‘Pressure Readout’ represents which tank (1,2 or
3) the pressure sensor is connected to. The above ‘Pressure Readout’ is displaying a ‘1’,
therefore the pressure readout displayed is connected to ‘Tank 1’. Up to 3 ‘Pressure Readouts’
can be displayed, if required. The units used are displayed in the ‘Pressure Readout’.
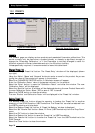
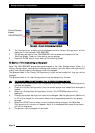
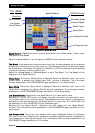
Selecting the ‘Pressure Readout’ from the ‘Working Screen’, displays the ‘Tank X Pressure’
window. The ‘X’ represents which tank (1,2 or3) the pressure sensor is connected to and which
tank the pressure alarms and pressure calibrations are set up for.
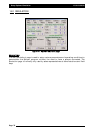
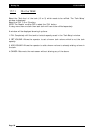
Setting the PRESSURE ALARMS
For a standard Broadacre System a low pressure alarm of 80 to 100kPa and a high pressure
alarm point of 450kPa are reasonable values. These settings will depend on the sprayer
configuration, nozzles, pumps and usage and could vary considerably from these values.
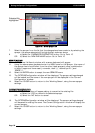
1- Setting the High Pressure Alarm Point.
The current High Pressure Alarm is displayed
Select the ‘Calculator Icon’ next ‘High Press. 1’, to set a new High Pressure Alarm.
Enter in the value using the Screen Keyboard.
Then select ‘ENTER’ to save the new value and close the window.
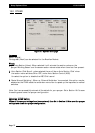
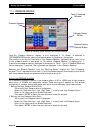
2- Setting the Low Pressure Alarm Point.
The current Low Pressure Alarm is displayed
Select the ‘Calculator Icon’ next ‘High Press. 1’, to set a new Low Pressure Alarm.
Enter in the value using the Screen Keyboard.
Then select ‘ENTER’ to save the new value and close the window.
Page 82
V1.98 21/06/06
Pressure Readout
Tank X Pressure
Window
Figure 56: Working Screen showing Tank Pressure window
Calibrate Sensor
Button
Restore Factory
Defaults Button