


Major Topic Heading
Setting Up- Tank
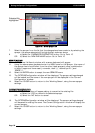
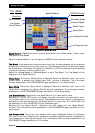
17.7 TANK SETUP
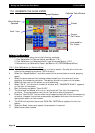
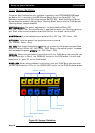
Selecting the ‘Tank Icon’ (1,2 or 3) displays the ‘Tank Setup’ window on the right hand side. If
more than one tank is selected then each tank has to be setup independently. To setup ‘Tank
1’ then select the ‘Tank 1 Icon’ from the ‘Working Screen’, the operator will know which Tank
is being changed because the ‘FILL’ and ‘Cal.’ buttons will reflect which Tank (1,2 or 3) was
selected. Then to setup ‘Tank 2’ select the ‘Tank 2 Icon’ to display ‘Tank Setup 2’ window.
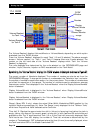
Next to each option the current value is displayed. To change the value, select the ‘Calculator
Icon’ next to the value to be changed and enter in the new value using the screen keyboard
window; then select the ‘ENTER’ button to save the new value and close the window.
The ‘Tank Setup’ window allows the operator to display or setup each ‘Tank’:
11))
TTaannkk
CCaappaacciittyy,,
allows the operator to set the ‘Tank Capacity’, so when the ‘FILL’ button is
selected the ‘Tank’ is filled to that capacity; the units being used are displayed on the ‘Tank
Icon’.
22))
PPrreesseett
RRaattee
11
&&
22
, the ‘Preset Rate 1’ is the main application rate that is going to be used
when spraying, the ‘Preset Rate 2’ is the second application rate, these rates are shown on the
‘Working Screen’ in between the Increase and Decrease buttons when in ‘AUTO’ mode, the
buttons are aligned with the ‘Tank Icon’ being changed. The units being used are displayed
on the ‘Tank Icon’, above the ‘Tank’ number.
33))
RRaattee
IInnccrreemmeenntt
allows the Increase or Decrease of the application rate (set by the Rate
Increment) while spraying, using the Increase or Decrease buttons for the selected ‘Tank’,
from the ‘Working Screen’.
44))
PPrreesseett
NNa
ammee
allows the selection of different products, if the products have different Flow
Calibration Factors. A drop down list is displayed, when the ‘Product’ is selected a Cal. Factor
is displayed next to the selected product. Select ‘ENTER’ to use the selected product. The
current Cal.Factor for the selected ‘Product’ is displayed under the product name.
New Products cannot be entered here; see Section 8.0 to enter new products to the list.
55))
TToottaall
CCaappaacciittyy
displays the cumulative total of product applied since the last reset.
66))‘‘TTaannkk
XX’’
OONN
oorr
OOFFFF
button allows individual tanks to be switched ON or OFF when more
than one tank is selected. If only one tank is selected then the button is not displayed.
The button displays whether the tank is ON or OFF, select the button to change. The ‘Tank
Icons’ on the ‘Working Screen’ are greyed out when the ‘Tank X’ is switched OFF and when
the ‘Tank X’ is switched ON the tank icon is ‘orange’.
Page 88
V1.98 21/06/06
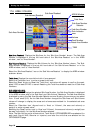
Capacity
Tank Setup
Window
Preset Rate 1
Preset Name
Increment
Preset Rate 2
Cal Factor
Tank 1 Icon
Tank 2 Icon
Total Capacity
Tank 1 ON/OFF
FILL (See Section 14.7.1)
Cal. (Calibrate) (See Section 14.8)
FFiigguurree
6600::
TTaannkk
SSeettuupp
wwiinnddooww