


Chapter 27 User Group
Vantage CNM User’s Guide
339
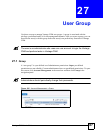
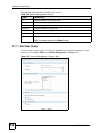
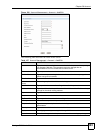
The following table describes the fields in this screen.
Table 165 Account Management > Group > Add
LABEL DESCRIPTION
Basic Information
Group Name Type a group name for this temperlate.
Description Type the description for the group.
Device Access Privileges Click the icon and the associated devices screen appears where
you can select associated device(s) this user group is allowed to
access to. Click Add to return to the previous screen and the selected
device(s) display in the Associated Folders/Devices field.
To unassociate a device to the VRPT server, click the icon and
unselect the associated device from the list. Then click Add.
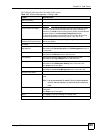
Device Management (Add/
Delete/Edit Devices/Folders)
Select this to allow this group adding, deleting, editing the selected
devices and folders.
Privileges
Device Operation & VPN
Management
Select this to allow the administrator to access the functions
associated to the Device Operation and VPN Management menus in
the menu bar.
Monitor Select this to allow the administrator to access the functions
associated to the Monitor menu in the menu bar.
Log & Report Select this to allow the administrator to access the functions
associated to the Log & Report menu in the menu bar.
CNM System Setting Select this to allow the administrator to access the functions
associated to the CNM System Setting menu in the menu bar.
Only Super can do this option.
Account Management Select this to allow the administrator to access the functions
associated to the Account Management menu in the menu bar.
Receive Email Alerts
Device Select this to allow the administrator to receive mails about device
alerts.
Note: It is recommended to select this for administrators
(not for device owners) to receive device alerts by
mail.
CNM Select this to allow the administrator to receive mails about Vantage
CNM alerts.
Only Super can do this option.
Apply Click Apply to save your settings in Vantage CNM.
Cancel Click Cancel to begin configuring the screen afresh.