


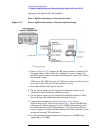

134 Chapter 2
Performance Verification Tests
17. Absolute Amplitude Accuracy (Reference Settings): Agilent E4401B and E4411B
Absolute Amplitude Accuracy (Lin) = Marker Amptd (dBm) −
Corrected Power Meter Reading (dBm)
17.If the analyzer is not equipped with Option 1DS, Press Preset and
wait for the preset routine to finish. Press
System, Alignments, Auto
Align
, All.
18.If the analyzer is equipped with Option 1DS, Preamplifier, proceed to
Part 3. Absolute Amplitude Accuracy, Preamp On (Option 1DS).
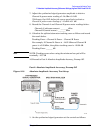
Part 3. Absolute Amplitude Accuracy, Preamp On (Option 1DS)
1. On the synthesized signal generator set the controls as follows:
FREQUENCY, 50 MHz
AMPLITUDE
, –4 dBm (50 Ω Input only)
AMPLITUDE, –8.3 dBm (75 Ω Input only)
RF ON
AM OFF
FM OFF
2. Calculate the ideal buried sensor reading by subtracting the
Tracking Error recorded in step 9 of Part 1 from
−30 dBm, the ideal
input level to the analyzer, as indicated below:
Ideal Buried Sensor Reading =
−30 dBm − Tracking Error
3. Adjust the synthesized signal generator to obtain the Ideal Buried
Sensor Reading calculated above
±0.1 dB.
4. Calculate the Corrected Power Meter Reading by adding the current
power meter reading to the Tracking Error recorded in Part 1, step 9
and record the result below:
Corrected Power Meter Reading = Power Meter Reading + Tracking
Error
Example: If the Power Meter Reading is
−9.74 dBm and the Tracking
Error is
−20.3 dB, the Corrected Power Meter Reading is −30.04 dBm
Corrected Power Meter Reading ________ dBm
5. Set the analyzer by pressing the following keys:
FREQUENCY, Center Freq, 50 MHz
SPAN, 2 kHz
BW/ Avg, Resolution BW, 1 kHz (Man)
BW/Avg, Video BW, 1 kHz (Man)
AMPLITUDE, Scale Type (Log)
AMPLITUDE, More, Y Axis Units, dBm (50Ω Input only)
AMPLITUDE, More, Y Axis Units, dBmV (75Ω Input only)
AMPLITUDE, Ref Level, −30 dBm (50Ω Input only)
AMPLITUDE, Ref Level, +18.75 dBmV (75Ω Input only)
AMPLITUDE, Attenuation, 0 dB
AMPLITUDE, More, Int Preamp (On)