


392 Chapter 2
Performance Verification Tests
53. IF INPUT Accuracy (Option AYZ only)
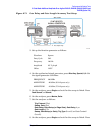
6. On the analyzer, press Single and wait for the sweep to finish.
7. On the analyzer, press
Peak Search (or Search).
8. Note the marker delta (
∆ Mkr1) frequency.
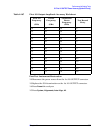
9. Calculate the new synthesized sweeper CW frequency by adding the
marker delta (
∆ Mkr1) frequency to 321.4 MHz. Set the synthesized
sweeper CW frequency to the new calculated frequency.
For example, if the marker delta (
∆ Mkr1) frequency is 725 Hz, the
new CW frequency would be 321.400725 MHz.
10.On the analyzer, press
System, Alignments,
Freq Correct (On).
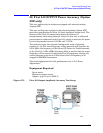
Setting the Synthesized Sweeper Power Level
11.Zero and calibrate the low-power sensor and power meter in dBm
mode using the 30 dB reference attenuator. Enter the 300 MHz
calibration factor of the power sensor into the power meter.
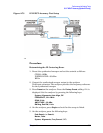
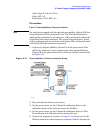
12.Connect the equipment as shown in Figure 2-73, with the output of
the synthesized sweeper connected to the power sensor using an
adapter between the cable and the power sensor.
13.Adjust the synthesized sweeper power level for a power meter
reading of –30 dBm
±0.1 dB.
14.Record the power meter reading as Input Power.
Input Power ____________dBm
Measuring the IF INPUT Accuracy
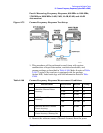
15.Connect the APC 3.5 cable from the RF OUTPUT of the synthesized
sweeper to the IF INPUT of the analyzer.
16.Press
Preset on the analyzer. Press the Factory Preset softkey, if it is
displayed. Set the analyzer by pressing the following keys:
System, Alignments, Auto Align, Off
AMPLITUDE, More 1 of 2, Corrections, Corrections
(Off)
AMPLITUDE, –30 dBm
Input/Output, Input Mixer, Input Mixer
(Ext)
Ext Mix Band, 26.5–40 GHz
FREQUENCY
, 30 GHz
SPAN, Zero Span
BW/Avg, Res BW, 1 kHz
17.Press Peak Search on the analyzer. Record the marker (Mkr1)
amplitude reading as the Measured Power.
Measured Power ____________dBm
New CW Fre
q
uenc
y
321.4 MHz ∆Mkr1 Fre
q
uenc
y
+=