


Chapter 2 49
Performance Verification Tests
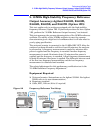
3. Frequency Readout and Marker Frequency Count Accuracy: Agilent E4401B, E4402B,
E4403B, and E4411B
“Part 2: Marker Count Accuracy”
Perform “Part 1: Frequency Readout Accuracy” before “Part 2: Marker
Count Accuracy”.
Part 1: Frequency Readout Accuracy
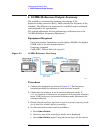
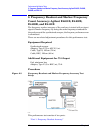
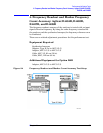
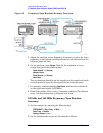
1. Connect the equipment as shown in Figure 2-3. Remember to
connect the 10 MHz REF OUT of the analyzer to the 10 MHz REF
INPUT of the synthesized sweeper.
CAUTION Use only 75 Ω cables, connectors, or adapters on instruments with 75 Ω
inputs, or the input connector will be damaged.
2. Perform the following steps to set up the equipment:
a. Press
INSTRUMENT PRESET on the synthesized sweeper, then set
the controls as follows:
CW, 1.490 GHz (Agilent E4401B and E4411B)
CW, 1.5 GHz (Agilent E4402B and E4403B)
POWER LEVEL, –10 dBm
b. Press Preset on the analyzer. Press the Factory Preset softkey, if it
is displayed. Set the analyzer by pressing the following keys:
FREQUENCY, 1.5 GHz
SPAN, 20
MHz
3. Press Peak Search (or Search) on the analyzer to measure the
frequency readout accuracy.
4. Record the marker frequency reading in the performance verification
test record.
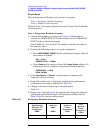
5. Repeat step 3 and step 4 above for the remaining spans listed in
Table 2-5.
Part 2: Marker Count Accuracy
Perform "Part 1: Frequency Readout Accuracy" before performing this
procedure.
1. Press
Preset on the analyzer. Press the Factory Preset softkey, if it is
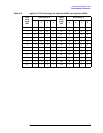
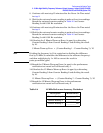
Table 2-5 Frequency Readout Accuracy
Analyzer Span
(MHz)
Test Record Entry,
Actual
Marker Frequency
20 1)
10 2)
1 3)