


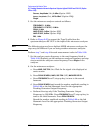

Chapter 2 357
Performance Verification Tests
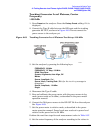
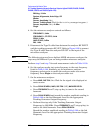
45. Tracking Generator Harmonic Spurious Outputs: Agilent E4401B and E4411B (Option
1DN or 1DQ)
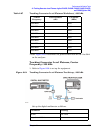
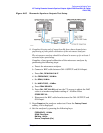
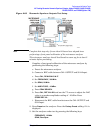
Figure 2-65 Harmonic Spurious Outputs Test Setup
2. Complete this step only if more than 24 hours have elapsed since
performing a front-panel calibration of the microwave analyzer.
The microwave analyzer should be allowed to warm up for at least 5
minutes before proceeding.
Complete a front-panel calibration of the microwave analyzer by
performing the following steps:
a. Preset the microwave analyzer.
b. Connect a BNC cable between CAL OUTPUT and 50
Ω Input.
c. Press
CAL, REALIGN LO & IF.
d. Set
FREQUENCY, 300 MHz.
e. Set
SPAN, 20 MHz.
f. Set
AMPLITUDE, –10 dBm.
g. Press
PEAK SEARCH.
h. Press
CAL, REF LVL ADJ and use the ⇑ ⇓ arrows to adjust the DAC
value to a marker amplitude reading of
−10 dBm. Press
STORE REF LVL.
i. Disconnect the BNC cable from between the CAL OUTPUT and
50
Ω Input.
3. Press
Preset on the analyzer under test. Press the Factory Preset
softkey, if it is displayed.
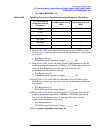
4. Set the analyzer by pressing the following keys:
FREQUENCY, 10 MHz
SPAN
, Zero Span
BW/Avg
, 10 kHz
Source
, Amplitude (On)