


Chapter 4 637
If You Have a Problem
Before You Call Agilent Technologies
Before You Call Agilent Technologies
Check the Basics
A problem can often be resolved by repeating the procedure you were
following when the problem occurred. Before calling Agilent
Technologies or returning the analyzer for service, please make the
following checks:
❏ Check the line fuse.
❏ Is there power at the receptacle?
❏ Is the analyzer turned on? Make sure the fan is running, which
indicates that the power supply is on.
❏ If the display is dark or dim, press the upper
Viewing Angle key in the
upper-left corner of the front panel. If the display is too bright, adjust
the lower
Viewing Angle key in the upper-left corner of the front
panel.
❏ If other equipment, cables, and connectors are being used with your
Agilent ESA Series Spectrum Analyzer, make sure they are
connected properly and operating correctly.
❏ Review the procedure for the measurement being performed when
the problem appeared. Are all the settings correct?
❏ If the analyzer is not functioning as expected, return the analyzer to
a known state by pressing the
Preset key.
Some analyzer settings are not affected by a Preset. If you wish to
reset the analyzer configuration to the state it was in when it was
originally sent from the factory, press
System, Power On/Preset,
Factory Preset (if it is displayed).
❏ Is the measurement being performed, and the results that are
expected, within the specifications and capabilities of the analyzer?
Refer to the “Specifications and Characteristics” chapters in the
Specifications Guide.
❏ In order to meet specifications, the analyzer must be aligned. Either
Auto Align All must be selected (press
System, Alignments, Auto
Align
, All), or the analyzer must be manually aligned at least once
per hour, or whenever the temperature changes more than 3
° C.
When
Auto Align, All is selected, AA appears on the left edge of the
display.
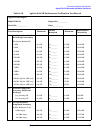
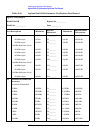
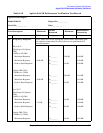
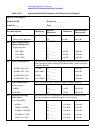
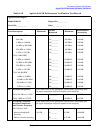
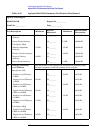
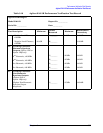
❏ If the necessary test equipment is available, perform the tests listed
in Chapter 1, “Calibrating,” for your instrument. Record all results
on the appropriate form in Chapter 3 , “Performance Verification
Test Records,” which follows the performance verification tests