


Workman HD Series Page 7 − 17 Chassis
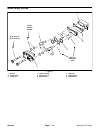
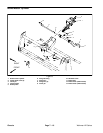
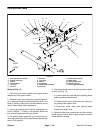
Removal (Fig. 9)
1. Park vehicle on a level surface, shut engine off, re-
move key from ignition switch and apply parking brake.
2. Remove hood to access brake master cylinder (see
Hood Removal in this section).
3. Remove cotter pin from the clevis pin that connects
master cylinder to brake pedal.
4. Clean hydraulic brake line area of master cylinder to
prevent contamination. Remove both brake lines from
master cylinder. Cap ends of brake lines and position
them away from master cylinder.
5. Remove two (2) flange head screws and flange nuts
that secure master cylinder to vehicle frame.
6. Remove master cylinder from vehicle.
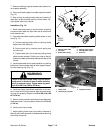
Installation (Fig. 9)
1. Position master cylinder to vehicle frame and secure
with two (2) flange head screws and flange nuts.
2. Remove plugs from brake lines. Install brake lines to
master cylinder. Make sure that brake lines are properly
connected to master cylinder (Fig. 10).
3. Make sure that master cylinder push rod is fully ex-
tended. Connect push rod clevis to brake pedal with cle-
vis pin and cotter pin.
4. Bleed brakes (see Bleed Brake System in this sec-
tion).
5. Install hood (see Hood Installation in this section).
CAUTION
After servicing the brakes, always check the
brakes in a wide open, level area that is free of
other persons and obstructions.
6. Check brake operation.
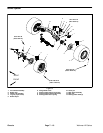
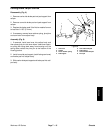
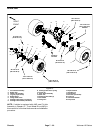
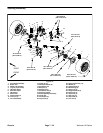
Figure 10
1. Brake master cylinder
2. Front brake line
3. Rear brake line
2
1
3
Chassis