


Workman HD Series Page 7 − 35 Chassis
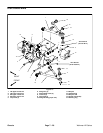
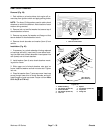
8. Remove flange nut that secures spring mount to leaf
spring and remove mount from spring.
9. Remove rubber bushings from leaf spring and frame
side rails.
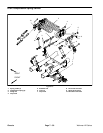
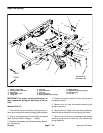
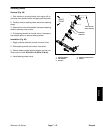
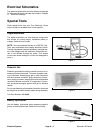
Installation (Fig. 27)
1. Make sure that four (4) rubber bushings are posi-
tioned in leaf spring and two (2) rubber bushings are
fitted in frame side rail.
2. Insert one (1) spring shackle, from inside/out, into
rear of leaf spring. Insert spring mount, from outside/in,
to front of leaf spring and secure, finger tight, with flange
nut.
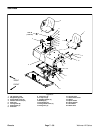
3. Install leaf spring assembly to frame and rear axle.
Secure spring mount to frame with two (2) flange head
screws and lock nuts and tighten finger tight. Tighten
flange nuts. Leave lock nuts that secure spring mount to
frame rail finger tight.
4. Insert second spring shackle through rubber bush-
ings in frame rail and onto spring shackle already placed
in leaf spring. Install flange nuts to spring shackles and
tighten finger tight.
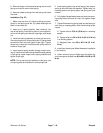
NOTE: During leaf spring installation, make sure axle
and spring plate are centered on leaf spring knob.
5. Install spring plate to top of leaf spring, then secure
spring to axle with bolts and washers. Tighten bolts in a
crossing pattern until spring plate, leaf spring and axle
contact.
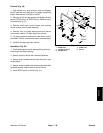
6. Fully tighten flange head screws and lock nuts secur-
ing spring mount to frame rail. Also, fully tighten flange
nuts.
7. Tighten bolts securing spring plate and leaf spring to
axle using a crossing pattern and the following torque
values:
A. Tighten bolts to 25 ft−lb (33 N−m) in a crossing
pattern.
B. Tighten bolts from 50 to 60 ft−lb (67 to 81 N−m)
in a crossing pattern.
C. Retighten bolts from 50 to 60 ft−lb (67 to 81
N−m).
8. Install rear wheels (see Wheel Assembly Installation
in this section).
9. Lower vehicle to ground. Make sure that wheel lug
nuts are properly torqued from 80 to 90 ft−lb (109 to 122
N−m).
Chassis