


4-20
Cisco CRS Carrier Routing System 8-Slot Line Card Chassis Installation Guide
OL-6256-17
Chapter 4 Installing and Removing Line Cards, PLIMs, and Associated Components
How to Install or Remove a Pillow Block
Required Tools and Equipment
.You need the following tools and parts to perform this task:
• ESD-preventive wrist strap
• Pillow block replacement kit (Cisco product number: CRS-PILLBLK=)
The following items are included in the CRS-PILLBLK= pillow block replacement kit:
• 2 replacement pillow blocks
• 6 Torx-head screws
• 1 T10 Torx screwdriver (See item 1 in Figure 4-15.)
Steps
To install a pillow block, follow these steps:
Step 1 Attach the ESD-preventive wrist strap to your wrist and connect its leash to one of the ESD connection
sockets on the front (PLIM) side of the chassis or a bare metal surface on the chassis.
Step 2 Locate the slot where the pillow block was removed.
Step 3 Have the replacement T10 Torx-head screws near at hand.
Step 4 Position the pillow block and align the screw holes.
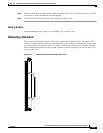
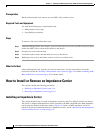
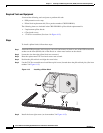
Step 5 Use the T10 Torx screwdriver to install the top left screw (located above the pillow block pin). (See item
number 2 in Figure 4-15.)
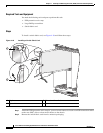
Figure 4-15 Installing a Pillow Block
Step 6 Install the lower right screw (see item number 3 in Figure 4-15).
211481
2
3
4
1