


4-42
Cisco CRS Carrier Routing System 8-Slot Line Card Chassis Installation Guide
OL-6256-17
Chapter 4 Installing and Removing Line Cards, PLIMs, and Associated Components
How to Install or Remove an RP, PRP, or DRP PLIM
• When you are certain that the second RP in the chassis is operational and, if not already the active
RP, ready to assume control (this happens automatically)
• When the chassis is undergoing scheduled maintenance
• When the Cisco CRS 8-slot line card chassis is powered down
Failure to follow these guidelines can result in interruptions in data communications and network
connectivity.
Required Tools and Equipment
You need the following tools to perform this task:
• ESD-preventive wrist strap
• Large Phillips screwdriver
Steps
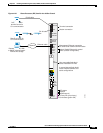
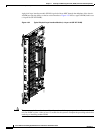
To remove an RP or DRP card, follow these steps:
Step 1 Attach the ESD-preventive wrist strap to your wrist and connect its leash to an ESD connection socket
on the front (PLIM) side or a bare metal surface on the chassis.
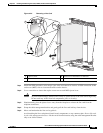
Step 2 Identify the card to be removed from the card cage. Remove any cables connected to the front panel of
the card.
Step 3 Use the screwdriver to turn the two captive screws on the front panel of the card counterclockwise to
loosen the card from the slot.
Step 4 Grasp the two card ejector levers and simultaneously pivot both ejector levers 90 degrees away from the
front edge of the card carrier to unseat the card from the backplane connector.
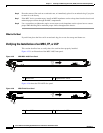
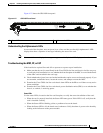
Step 5 Touching only the metal card carrier, slide the card from the slot and place it directly into an antistatic
sack or other ESD-preventive container. If you plan to return the defective card to the factory, repackage
it in the shipping container you received with the replacement card.
What to Do Next
After performing this task, replace any front cover plates.