


2-39
Cisco CRS Carrier Routing System 8-Slot Line Card Chassis Installation Guide
OL-6256-17
Chapter 2 Installing and Removing Power Components
How to Install or Remove Modular Configuration Power Components
Required Tools and Equipment
You need the following tools to perform this task:
• 6-in. long number 1 Phillips screwdriver
Note You can use an offset number 1 Phillips screwdriver to tighten the AC cord clamp that was available
pre-June 2011, but this is optional. An offset screwdriver is not required to tighten the AC cord clamp
that is available from June 2011 onwards. See Figure 2-29.
Steps
To install the AC cords, go to the rear of the chassis and perform the following steps:
Step 1 Insert the AC cords into the AC cord clamps, as shown in Figure 2-29.
Note If you have a Cisco CRS PDU installed, the AC cords must be installed as labelled. For further
information, refer to Cisco CRS 3-Phase AC Power Distribution Unit Installation Guide.
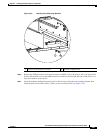
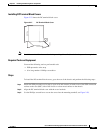
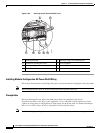
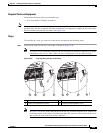
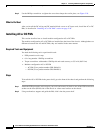
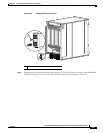
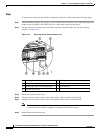
Figure 2-29 Inserting AC Cord into Cord Clamp
Note In Figure 2-29, the AC cord clamp shown on the left was available until June 2011, and the AC
cord clamp shown on the right is available from June 2011 onwards. The location of the screw
that secures the cord in the cord clamp is different.
1 Cord clamp 3 Screw that secures the cord in clamp
2 Cord to be inserted into clamp 4 Screwdriver that tightens screw
209331
3 4 213 4 21