


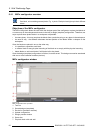
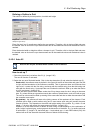
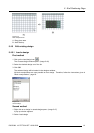
5. Wall Positioning Page
String direction
1. Click on the desired radio button to set up the string direction.
Note: The block connected with the controller has a shaded background.
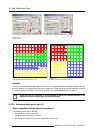
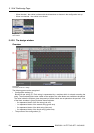
Horizon-
tal
the bocks will be placed in a horizontal way. From left to right or from right to left.
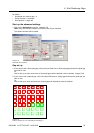
Vertical
the bocks will be placed in a vertical way. From top to bottom or from bottom to top.
See image 5-35, image 5-36.
01
23
01
23
01
23
01
23
01
23
01
23
01
23
01
23
01
23
01
23
01
23
01
23
01
23
01
23
01
23
01
23
01
23
01
23
01
23
01
23
01
23
01
23
01
23
01
23
01
23
01
23
01
23
01
23
01
23
01
23
01
23
01
23
01
23
01
23
01
23
01
23
01
23
01
23
01
23
01
23
01
23
01
23
01
23
01
23
01
23
01
23
01
23
01
23
01
23
01
23
01
23
01
23
01
23
01
23
01
23
01
23
01
23
01
23
0
1
2
3
01
2
3
01
2
3
01
2
3
01
2
3
01
2
3
01
23
01
23
01
23
01
23
01
23
01
23
01
23
01
23
01
23
01
23
01
23
01
23
01
23
01
23
01
23
01
23
0
1
23
01
23
01
23
01
23
01
23
01
23
01
23
01
23
01
23
01
23
01
23
01
23
01
23
01
23
01
2
3
01
23
01
23
01
23
01
23
01
23
01
23
01
23
01
23
01
23
01
23
01
23
01
23
01
23
01
23
01
23
01
23
01
23
01
23
0
1
23
01
23
01
23
01
23
01
23
01
23
01
23
01
23
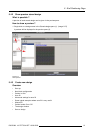
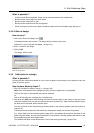
Image 5-35
Auto fill, viewport 22 x 22, horizontal string direction
01
23
01
23
01
23
01
23
01
23
01
23
01
23
01
23
01
23
01
23
01
23
0
1
2
3
0
1
2
3
0
1
2
3
0
1
2
3
0
1
2
3
0
1
2
3
0
1
2
3
0
1
2
3
0
1
2
3
0
1
2
3
0
1
2
3
01
23
01
23
01
23
01
23
01
23
01
23
01
23
01
23
01
23
01
23
01
23
0
1
2
3
0
1
2
3
0
1
2
3
0
1
2
3
0
1
2
3
0
1
2
3
0
1
2
3
0
1
2
3
0
1
2
3
0
1
2
3
0
1
2
3
0
1
2
3
0
1
2
3
0
1
2
3
0
1
2
3
0
1
2
3
0
1
2
3
0
1
2
3
0
1
2
3
0
1
2
3
0
1
2
3
0
1
2
3
0
1
2
3
0
1
2
3
0
1
2
3
0
1
2
3
0
1
2
3
0
1
2
3
0
1
2
3
0
1
2
3
0
1
2
3
0
1
2
3
0
1
2
3
0
1
2
3
0
1
2
3
0
1
2
3
0
1
2
3
0
1
2
3
0
1
2
3
0
1
2
3
0
1
2
3
0
1
2
3
0
1
2
3
0
1
2
3
0
1
2
3
0
1
2
3
0
1
2
3
0
1
2
3
0
1
2
3
0
1
2
3
0
1
2
3
0
1
2
3
0
1
2
3
0
1
2
3
0
1
2
3
0
1
2
3
0
1
2
3
0
1
2
3
0
1
2
3
0
1
2
3
0
1
2
3
0
1
2
3
0
1
2
3
0
1
2
3
0
1
2
3
0
1
2
3
0
1
2
3
0
1
2
3
0
1
2
3
0
1
2
3
0
1
2
3
0
1
2
3
0
1
2
3
0
1
2
3
0
1
2
3
0
1
2
3
0
1
2
3
0
1
2
3
0
1
2
3
0
1
2
3
0
1
2
3
0
1
2
3
0
1
2
3
0
1
2
3
0
1
2
3
0
1
2
3
0
1
2
3
0
1
2
3
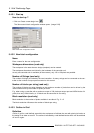
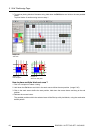
Image 5-36
Auto fill, viewport 22 x 22, horizontal string direction
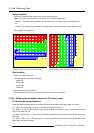
Start position
1. Click on the drop down box.
The possible choices will be displayed.
- Upper left
- Upper right
- Lower right
- Lower left
2. Select the desired start position.
This start position will only be used when snake wise auto fill is selected.
5.4.3.6 Some typical examples where auto fill is very useful
For horizontal string directions
When the width matches exactly the number of blocks to be placed, the height does not matter:
e.g. width = 64 with no gap : each row will be filled up with one string.
e.g. width = 32 with no gap : the first string will be divided over the first 2 rows. The second string will
start on the third row, etc.
e.g. width = 95 with gap = 1 : each row will be filled up with one string. Between each block there is one
pixel gap.
e.g. width = 126 or 127 or 128 with gap = 2 : each row will be filled up with one string. Between each
block there are two pixel gaps.
56
R5976380 XLITE TOOLSET 16/03/2005