


Use the Setup Wizard to Provision the UTM in Your Network
55
ProSecure Unified Threat Management (UTM) Appliance
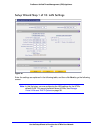
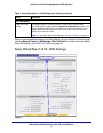
Enter the settings as explained in the following table, and then click Next to go the following
screen.
After you have completed the steps in the Setup Wizard, you can change the date and time
by selecting Administration > System Date & Time. For more information about these
settings, see Configure Date and Time Service on page 456.
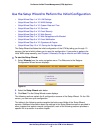
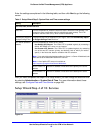
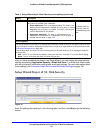
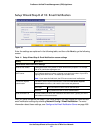
Setup Wizard Step 4 of 10: Services
Figure 29.
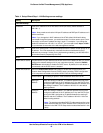
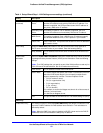
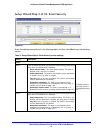
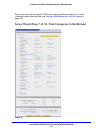
Table 6. Setup Wizard Step 3: System Date and Time screen settings
Setting Description
Set Time, Date, and NTP Servers
Date/Time From the drop-down list, select the local time zone in which the UTM operates. The
correct time zone is required in order for scheduling to work correctly. The UTM
includes a real-time clock (RTC), which it uses for scheduling.
Automatically Adjust for
Daylight Savings Time
If daylight savings time is supported in your region, select the Automatically Adjust
for Daylight Savings Time check box.
NTP Server (default or
custom)
From the drop-down list, select an NTP server:
• Use Default NTP Servers. The UTM’s RTC is updated regularly by contacting a
default NETGEAR NTP server on the Internet.
• Use Custom NTP Servers. The UTM’s RTC is updated regularly by contacting
one of the two NTP servers (primary and backup), both of which you need to
specify in the fields that become available with this selection.
Note: If you select this option but leave either the Server 1 or Server 2 field blank, both
fields are set to the default NETGEAR NTP servers.
Note: A list of public NTP servers is available at
http://support.ntp.org/bin/view/Servers/WebHome.
Server 1 Name / IP
Address
Enter the IP address or host name of the primary NTP server.
Server 2 Name / IP
Address
Enter the IP address or host name of the backup NTP server.