


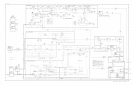

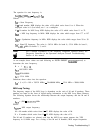
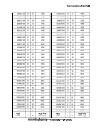
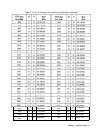
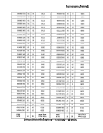


(fM/N),
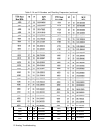
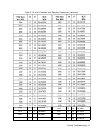
and the YTO frequencies, refer to Table 2, M and N Numbers and Resulting
Frequencies.
20/30
Synthesizer Tuning
When a start frequency change occurs, the YTO is pretuned near the new desired frequency
by the A19 Digital-Analog Converter and A20 Main Coil Driver. This places the YTO
frequency 20 to 30 MHz below the Nth harmonic of the M/N Loop output. (The Nth
harmonic is the same as the M/N Loop’s N number.) The YTO frequency and the M/N Loop
harmonic are mixed in the
AllA
Sampler. The YTO IF
(20-
30 MHz) is phase compared
with the
20/30
Synthesizer output. The
AllA
Phase Detector’s error voltage is then used
to tune the YTO through the A21 FM Coil Driver and the A20 Main Coil Driver to achieve
phase-lock.
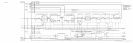
The
20/30
Synthesizer is used to pretune the YTO in 1 Hz steps (in zero frequency span)
through a 10 MHz range. The following formula expresses the relationship between the
frequencies found in the YTO Loop.
&o/so
(N
x
fM/N)
-
f0
=
fYTOIF
Where:
f2u,su
=
20/30
Synthesizer frequency. (Displayed with KSR.)
N = N number, varies from 11
-
32. (KSR displays value of N.)
fM/N
=
M/N Loop frequency
fo = YTO frequency
fYToIF
= YTO IF frequency
The
20/30
Synthesizer frequency can also be determined by using the YTO frequency set.
This frequency is available by using KSR. In this case,
f2,,/s,,
= (30.000000
-
D7
D6
Ds
D4
Ds
Dz
Dr)
Where:
Dr to
Dr
is the YTO frequency displayed with Dr being the least significant digit (1 Hz).
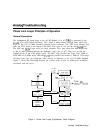
Marker Mode
When
the MARKER
@GG)
mode is selected, the analyzer does the following. First, the
center
frequency is determined. Because the
@GGiJ
marker is a display marker, after the
center
frequency is calculated, the position of the marker on the display is determined. By
knowing that the display consists of 1000 points and the programmed frequency span, the
processor calculates the offset between the center frequency and the marker. The frequency
span accuracy is the major cause of error in the readout accuracy of the MARKER
(NORMAL]
mode.
6 Analog Troubleshooting