


Use the Setup Wizard to Provision the UTM in Your Network
68
ProSecure Unified Threat Management (UTM) Appliance
Verify Correct Installation
• Test Connectivity
• Test HTTP Scanning
Test the UTM before deploying it in a live production environment. The following instructions
walk you through a couple of quick tests that are designed to ensure that your UTM is
functioning correctly.
Test Connectivity
Verify that network traffic can pass through the UTM:
1. Ping an Internet URL.
2. Ping the IP address of a device on either side of the UTM.
Test HTTP Scanning
Verify that the UTM scans HTTP traffic correctly:
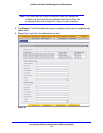
1. Log in to the UTM web management interface, and then verify that HTTP scanning is
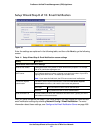
enabled. HTTP scanning is enabled by default (see Setup Wizard Step 4 of 10: Services
on page 55).
2. Take note of the web security settings for HTTP (see Setup Wizard Step 6 of 10: Web
Security on page 58).
3. If client computers have direct access to the Internet through your LAN, try to download the
eicar.com test file from http://www.eicar.org/download/eicar.com.
The eicar.com test file is a legitimate denial of service (DoS) attack and is safe to use
because it is not a malware threat and does not include any fragments of malware code.
The test file is provided by EICAR, an organization that unites efforts against computer
crime, fraud, and misuse of computers or networks.
4. Check the downloaded eicar.com test file, and note the attached malware information file.
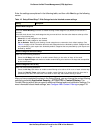
What to Do Next
You have completed setting up the UTM to the network. The UTM is now ready to scan the
protocols and services that you specified and perform automatic updates based on the
update source and frequency that you specified.
If you need to change the settings, or to view reports or logs, log in to the UTM web
management interface, using the default IP address or the IP address that you assigned to
the UTM in Setup Wizard Step 1 of 10: LAN Settings on page 48.