


126
ADVANCED EDITING TECHNIQUES CHP. 5
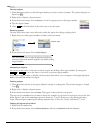
Using the event snap offset
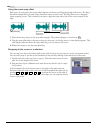
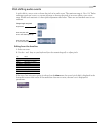
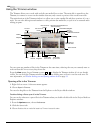
Each event in your project has a snap offset flag that can be moved along the length of the event. The flag is
the white triangle that is located in the lower-left corner of each event. This flag allows you to designate
where snapping occurs. This is useful if you need to align the snap with a beat in the event instead of the
edge.
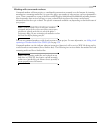
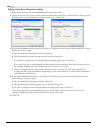
1.
Place the mouse pointer on the snap offset triangle. The pointer changes to a hand icon ( ).
2.
Drag the snap offset flag to the new position in the event. As the flag moves, a time display appears. This
time display indicates where the snap offset flag occurs in time in the event.
3.
Release the mouse to set the snap offset flag.
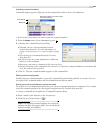
Snapping to the cursor or a selection
You can snap two clips in the same track end-to-end, but how can you snap two events on separate tracks?
You can easily snap to specific event boundaries in any track by making a time selection for the event.
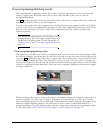
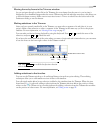
1.
Double-click the event you want to snap to. The time selection area on the
ruler sets to the length of the event.
2.
Drag another clip in a different track near the end of the first clip. It snaps
into position.
In this example, the second event snaps to the edge of the time selection.
Because events also snap to the cursor, you could accomplish the same task by
pressing
or to position the cursor on the edge of
the first event. Once the cursor is on the event edge, you can snap the second
event to the cursor.
Snap offset flag
Ctrl +Alt+ Ctrl +Alt+