


CHP. 17 SAVING, RENDERING, AND PRINTING PROJECTS
315
2.
Connect the USB cable and AC adapter to the PSP™ system and place it in USB mode.
3.
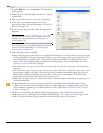
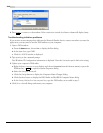
From the Tools menu, choose Export to PSP™ (PlayStation®Portable). The Export to PSP™
(PlayStation®Portable) dialog is displayed.
Note:
If you want to render an H.264 video without
transferring to a PSP, use the Render As dialog and choose
Sony AVC/AAC (*.mp4) from the Save as Type drop-
down list. Name the rendered file in the format
MAQ0nnnn.MP4 (where nnnn is a number) to conform to
the PSP file-naming convention.
4.
The Title box displays the title of your project from the Summary tab of the Project Properties dialog. This
title will be displayed on the PSP.
Editing the title in the Export to PSP™ (PlayStation®Portable) dialog will also update the Project
Properties dialog.
5.
The File path box displays the folder and file name that will be used to render your movie. If you want to
replace an existing movie, choose its name from the
File path drop-down list. Click the Refresh button if
you need to rescan the device.
6.
Choose a setting from the Tem plat e drop-down list to specify the settings that will be used to save your file.
You can choose to encode with QVGA or QVGA widescreen frame aspect. Both settings create 320x240
video, but the widescreen templates use anamorphic widescreen encoding, which is properly decoded on
the PSP™ system.
When you use the
Automatic frame size templates, the video is encoded using the Pixel aspect ratio setting
from the video tab of the Project Properties dialog. When using these templates, set your project aspect
ratio to DV for 4:3 content or DV Widescreen for 16:9 content.
All templates use 128 Kbps audio. The 512 Kbps templates are useful when you want to minimize file size,
and the 896 Kbps templates will produce higher-quality video, especially in scenes with high-motion
video.
Note:
The settings for the selected template are displayed in
the Description box.
7.
Select the Render loop region only check box if you only want to render a portion of your project. If the
check box is cleared, the entire project will be rendered to a new file.
8.
Select the Stretch video to fill output frame size (do not letterbox) check box if you want to reformat your video
so it fills the output frame size listed in the
Description box. When the check box is cleared, the current
aspect ratio is maintained and black borders are added to fill the extra frame area (letterboxing). This
option is useful when the desired output format does not match the frame aspect ratio of your project.
9.
Click OK. Your movie file (MAQ0nnnn.MP4) and thumbnail file (MAQ0nnnn.THM) are created and
transferred to the appropriate folder on the PSP™ system.