


CHP. 2 GETTING STARTED
45
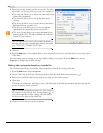
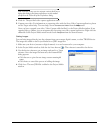
Saving a project
When you save your work, it is saved in a project file. Project files are not rendered media files.
1.
From the File menu, choose Save.
The first time you save a project, the Save As dialog appears. In subsequent saves, the dialog is bypassed,
your existing file name is retained, and your project is updated to include any implemented changes.
2.
Select the drive and folder where you want to store the project.
3.
Type the project name in the File Name box.
4.
Click Save.
Tip:
Select the Copy and trim media with project check box to
save the project file and copies of the media files to a common
location. For more information, see Saving a project with
media on page 306.
Renaming a project (using Save As)
After you have been working with your project, you can use the Save As command in the File menu to save
a copy of a project with a new name. This is useful for backing up different versions of a project. For more
information, see Creating a copy of a project (using Save As...) on page 306.
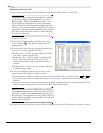
Getting media files
You can add media from a variety of sources to your project. You can add audio and video files, record audio
into a track, capture video from a video camera, or extract music from your own CD. You can also create
media such as text overlays, backgrounds, and credit rolls from within the software. For more information, see
Using generated media on page 247.
Note:
To have pulldown fields automatically removed when
opening 24 fps progressive-scan DV video files in the full
version of Vegas software, select the
Allow pulldown removal
when opening 24p DV
check box on the General tab of the
Preferences dialog. To open your 24p DV video files as
29.97 fps interlaced video (60i), clear this check box.
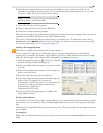
Note:
When you add an ACID loop to the timeline, it is
automatically stretched to match the project tempo as
specified on the
Ruler tab of the Project Properties dialog. If
you want to ignore tempo information, clear the
Import audio
at project tempo
check box on the Audio tab of the Preferences
dialog. For more information on project properties, see
Working with project properties on page 333. For more
information on preferences, see Setting preferences on page
336.